We remain fully operational. Our teams are working around the clock to ensure your deliveries continue safely.

DOWNLOAD THE APP


Customer Services
Copyright © 2025 Desertcart Holdings Limited
DOWNLOAD THE APP


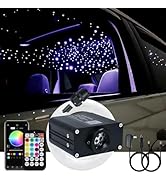
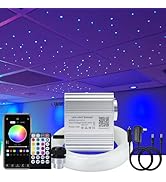
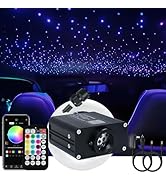
✨ Transform your space into a cosmic wonderland with a tap or a beat! 🚀
The AKEPO 16W Fiber Optic Lights Starlights Headliner Kit features 550 fiber optic cables (13.1ft/4m) with 0.75mm diameter, delivering RGBW lighting controlled via Bluetooth APP or 28-key RF remote. It supports 16 million colors, music-activated modes, and adjustable brightness, designed for safe, waterproof use in cars or homes. Plug-and-play with included US and car adapters, backed by a 2-year warranty.


| ASIN | B07PDDNPLX |
| Batteries are Included | No |
| Best Sellers Rank | #123,894 in Tools & Home Improvement ( See Top 100 in Tools & Home Improvement ) #80 in Fiber Optic Lights |
| Brand Name | AKEPO |
| Color | Multicolor |
| Customer Reviews | 4.6 out of 5 stars 1,300 Reviews |
| Item Dimensions L x W x H | 4.53"L x 3.15"W x 1.46"H |
| Item Weight | 3 Pounds |
| Light Source Special Features | remote control,rgbw |
| Light Source Type | LED |
| Light Source Wattage | 16 Watts |
| Manufacturer | Guangzhou Huaxi Lighting Technology Co., Ltd. |
| Material | Aluminum |
| Material Type | Aluminum |
| Model Number | QJ-L016 |
| Mounting Type | Ceiling Mount |
| Number of Batteries | 1 CR2 batteries required. |
| Number of Light Sources | 1 |
| Power Source | Corded Electric |
| Shade Material | Aluminum |
| Shape | Miniature |
| Specification Met | star |
| Style Name | Art Deco |
| UPC | 769407390335 |
| Unit Count | 1 Count |
| Voltage | 110 Volts |
A**A
Awesome
I love this headline star kit. I installed it on my 2002 Subaru and it looks amazing. I always get compliments from people when they see the lights in my car.
B**R
Worked Fine.
It installed fine and looks good.
S**O
Luces para el carro
Bellas
P**O
They work perfectly
Took some time to install but the results are great! They work great, and for the price you are getting a good quality product!! And brightness oh man! Your are for sure to light up your car!
P**B
Love these
Made my own headliner for my jeep wrangler (soft top so they don’t have a headliner). Really had no idea how many I would need since it is a smaller size and wish I bought a large quantity. But omg the headliner with these came out so cute. Be VERY careful moving these around after you take the plastic off. I literally brought them from one room to the next and somehow ended up with the biggest tangled mess which took me almost three hours to untangle (not the fault of the manufacturer or product) I did take a star off because these did not work at all with music as advertised which was something I really wanted! So now I just have them on a fade where they just cicyle through all the colors. I definitely recommend these as long as you aren’t looking to have them play to music
Z**N
Step by step install process
The overall project took about 3 days (18 hours) of work, lookup YouTube videos, BE WARNED, don’t get in over your head with this it is a big project but well worth it. Start by finding a video of how to remove the headliner, generally secured by screws in the visor and clips on the plastic trim and seal of the vehicle, once the headliner is removed use a colored sharpie and divide it into 4 sections, you can do more if it’s a big headliner as I drew 10 sections as I have a big SUV, then divide the sections by how many fiber optics you got, mine was 10 sections, 550 fiber optic cables, so it was 55 cables per section, I also made 10 sections so I knew the lights would be evenly distributed, then mark your sections with a dot or X to know where to make the holes, use a small drill bit (drill is highly recommended as there are a lot of holes to make) or use a tac, drill all the holes then grab your fiber optic cables and start from the back to front feeding the cables into the holes, make sure you have a good spot to put the light box inside of your trim or if it fits in the headliner, feed all excess Clarke’s through the holes to avoid a bunch of slack and bulk to the headliner, once’s all cables are fed through begin hot glueing (USE LOW TEMP HOT GLUE GUN) or an epoxy like E6000 which you can find at your local Walmart, if you use the epoxy which I recommend, don’t be stingy, make sure there’s plenty of glue in each hole where the cable is fed through to avoid them slipping out and you having empty patches. Look Also for epoxy let it set overnight to create a strong bond, hot glue is a fast way to secure the cables but be careful as even low temp guns can melt the cables from the temp, some glues like superglue will also break the cables do to the chemicals, so use E6000 epoxy. Make sure you glued ALL the cables down look over it a few times you’ll find some you missed I promise, Once it’s all prepped to be re installed call up a friend to help, you’ll need it, start by feeding the headliner preferably through the trunk and secure it from the front to back, ensure your cars door seals go back over the headliner so you don’t get a leak, make sure all clips are back in place and test out the lights. begin trimming your excess cables flush with the headliner, use normal sized nail clippers or thin small scissors, then sit back and enjoy the light show (
B**.
Worked great
Works great for my project, I was not installing it in my care but using it for a odd shaped lamp. The fibers can be time consuming to thread through the material but ultimately end up looking great. The only issue I really had was how short the wire for the wall outlet plug is, had to splice it for my needs.
V**Z
NA
great packaging and good quality everything came out good & how i expected
Trustpilot
1 day ago
3 weeks ago