We remain fully operational. Our teams are working around the clock to ensure your deliveries continue safely.

DOWNLOAD THE APP


Customer Services
Copyright © 2025 Desertcart Holdings Limited
DOWNLOAD THE APP


✨ Restore. Refresh. Reclaim your flawless countertop! 🛠️
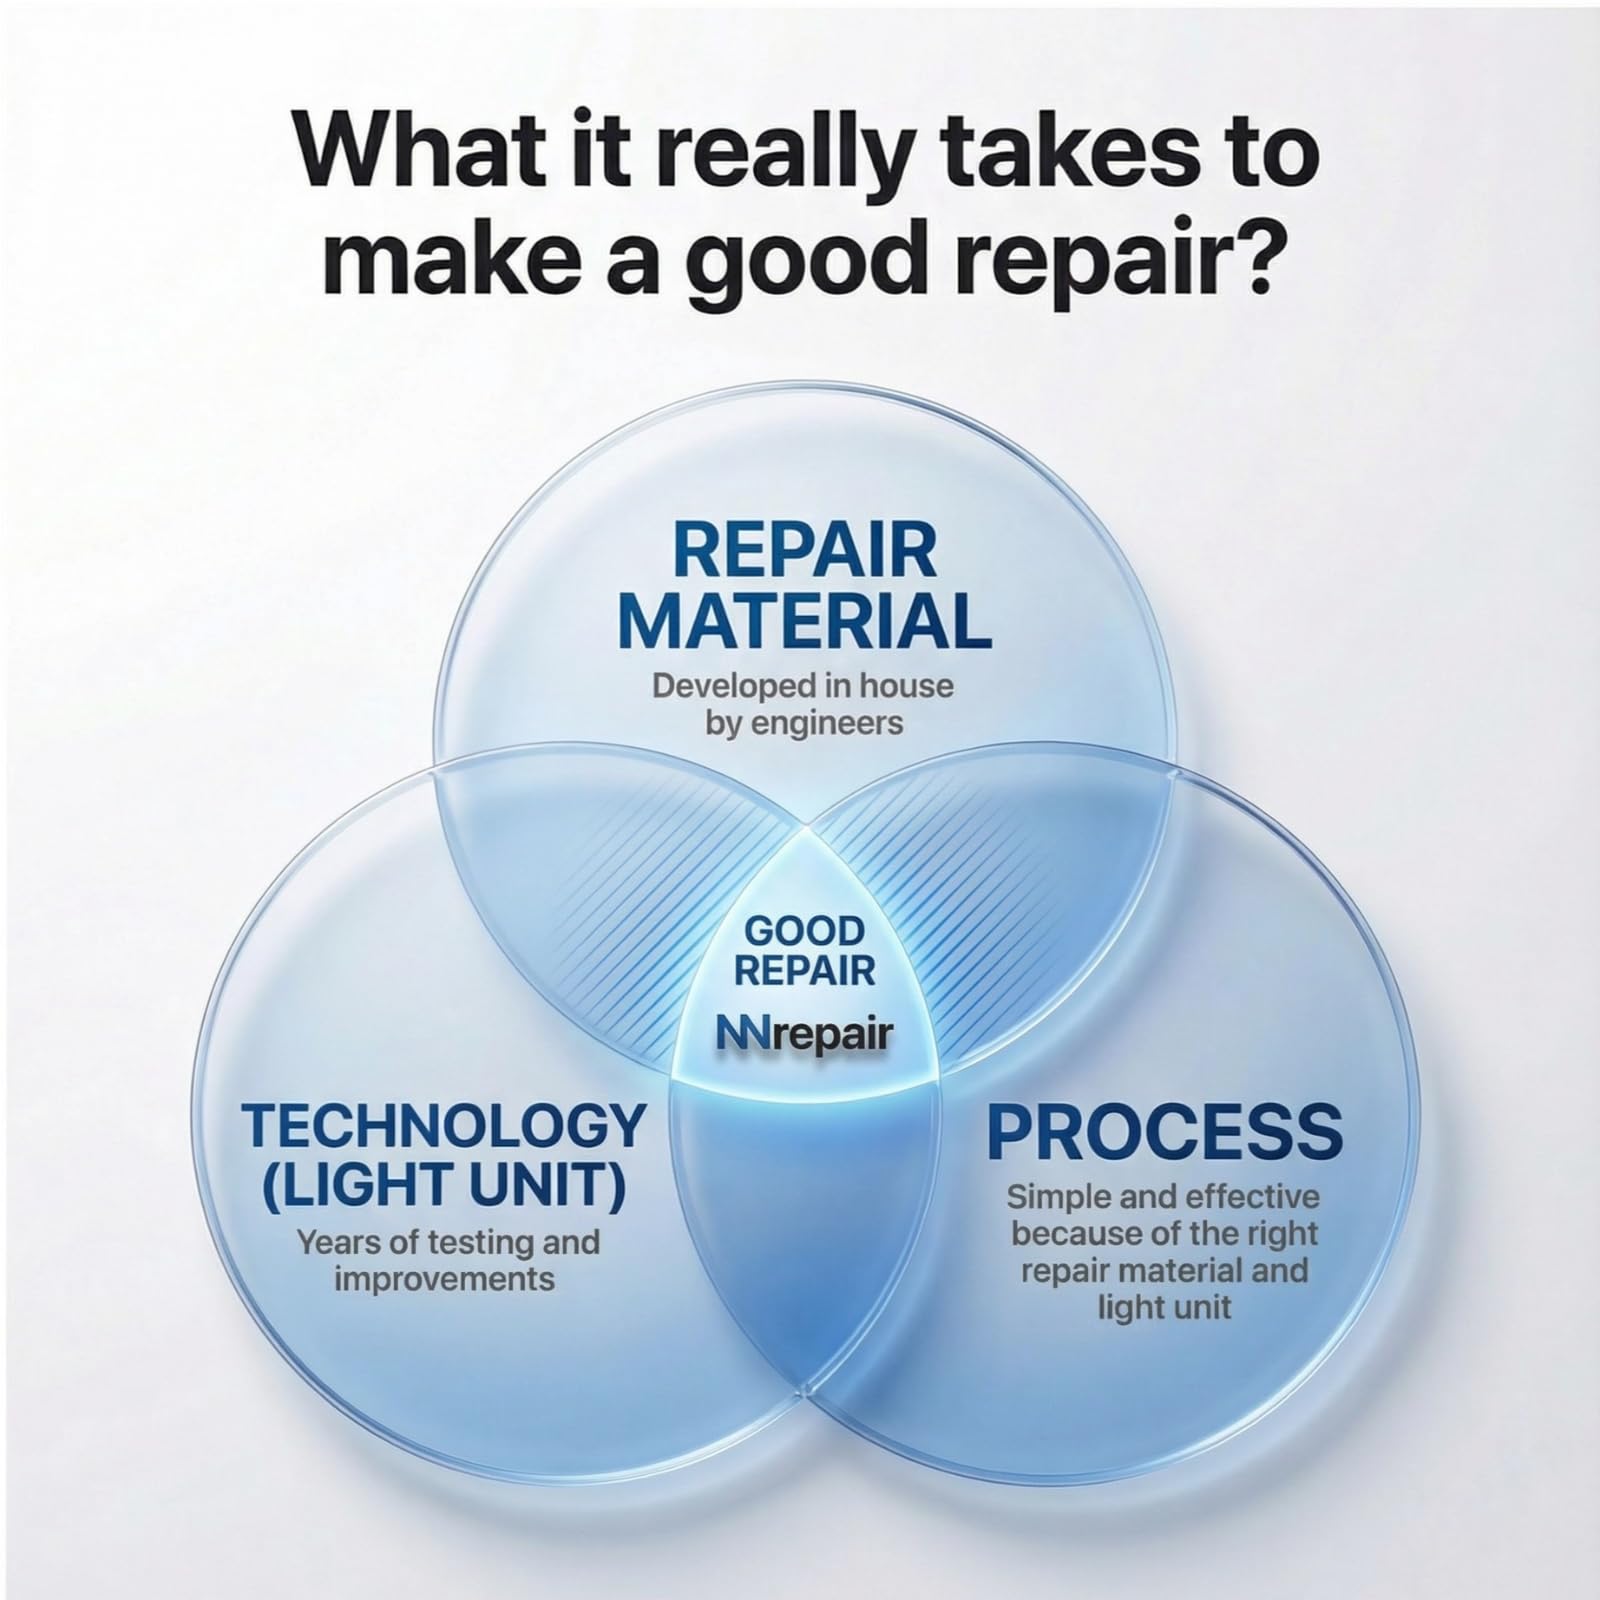
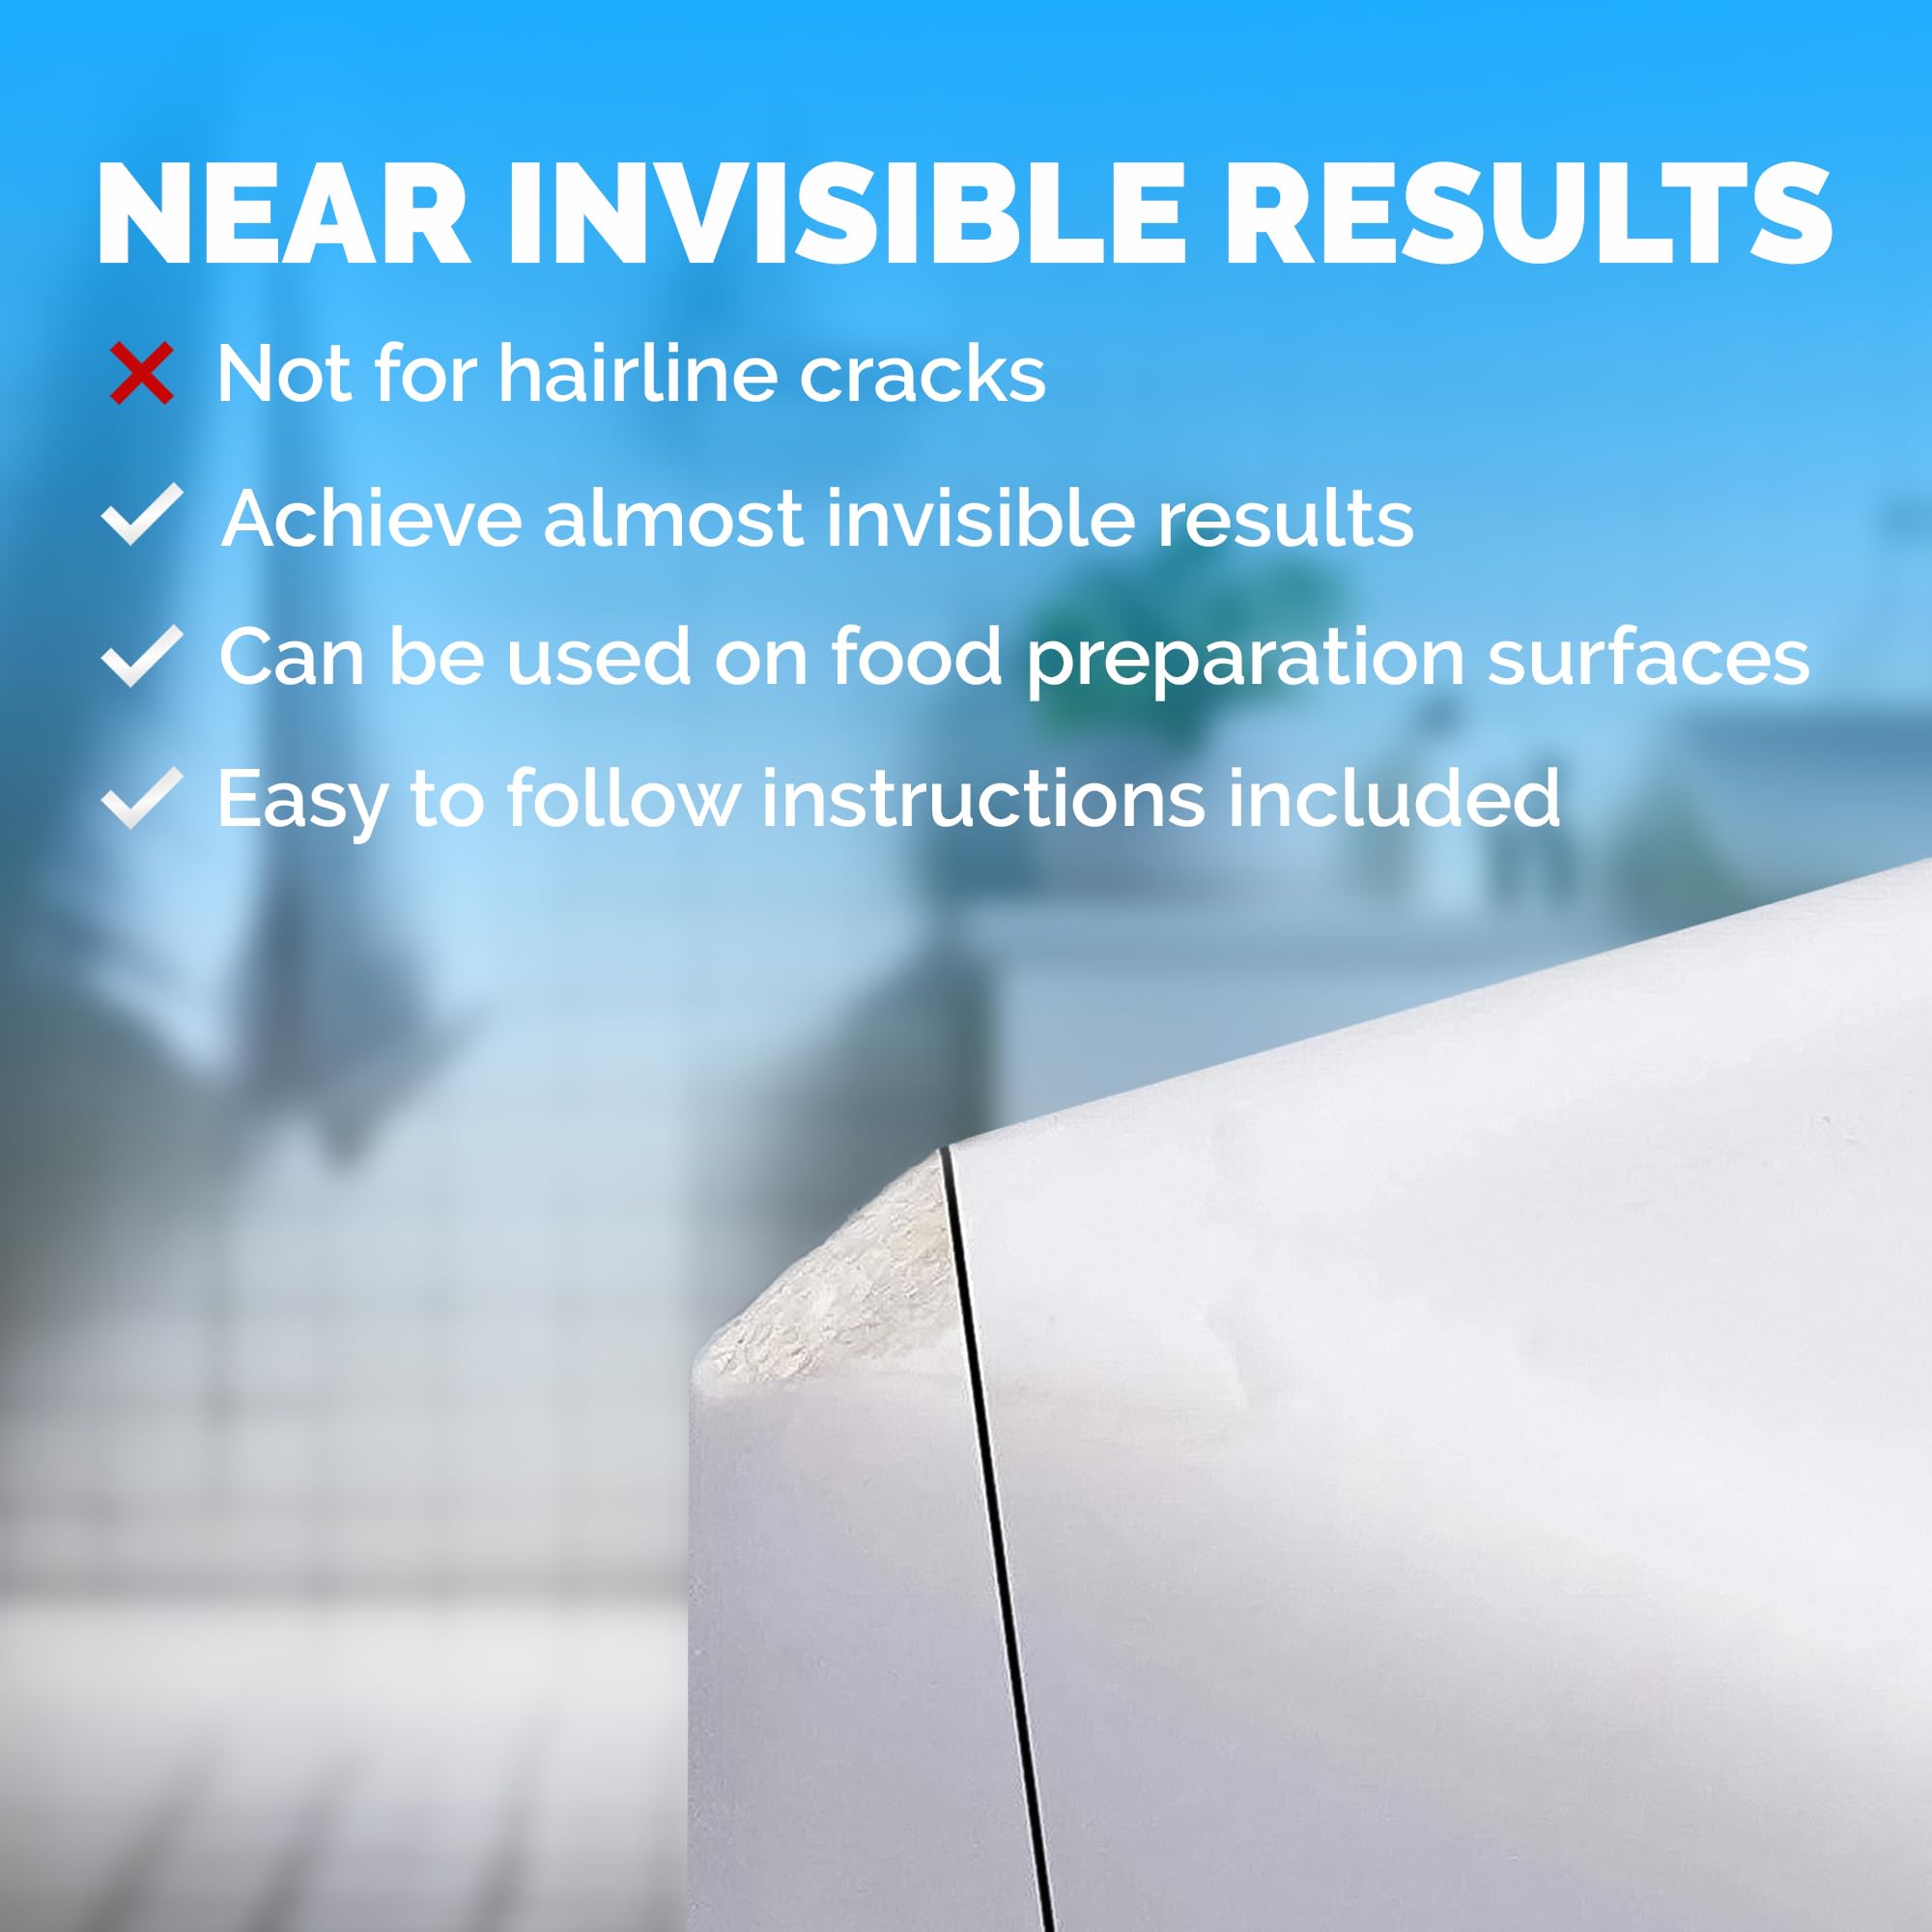
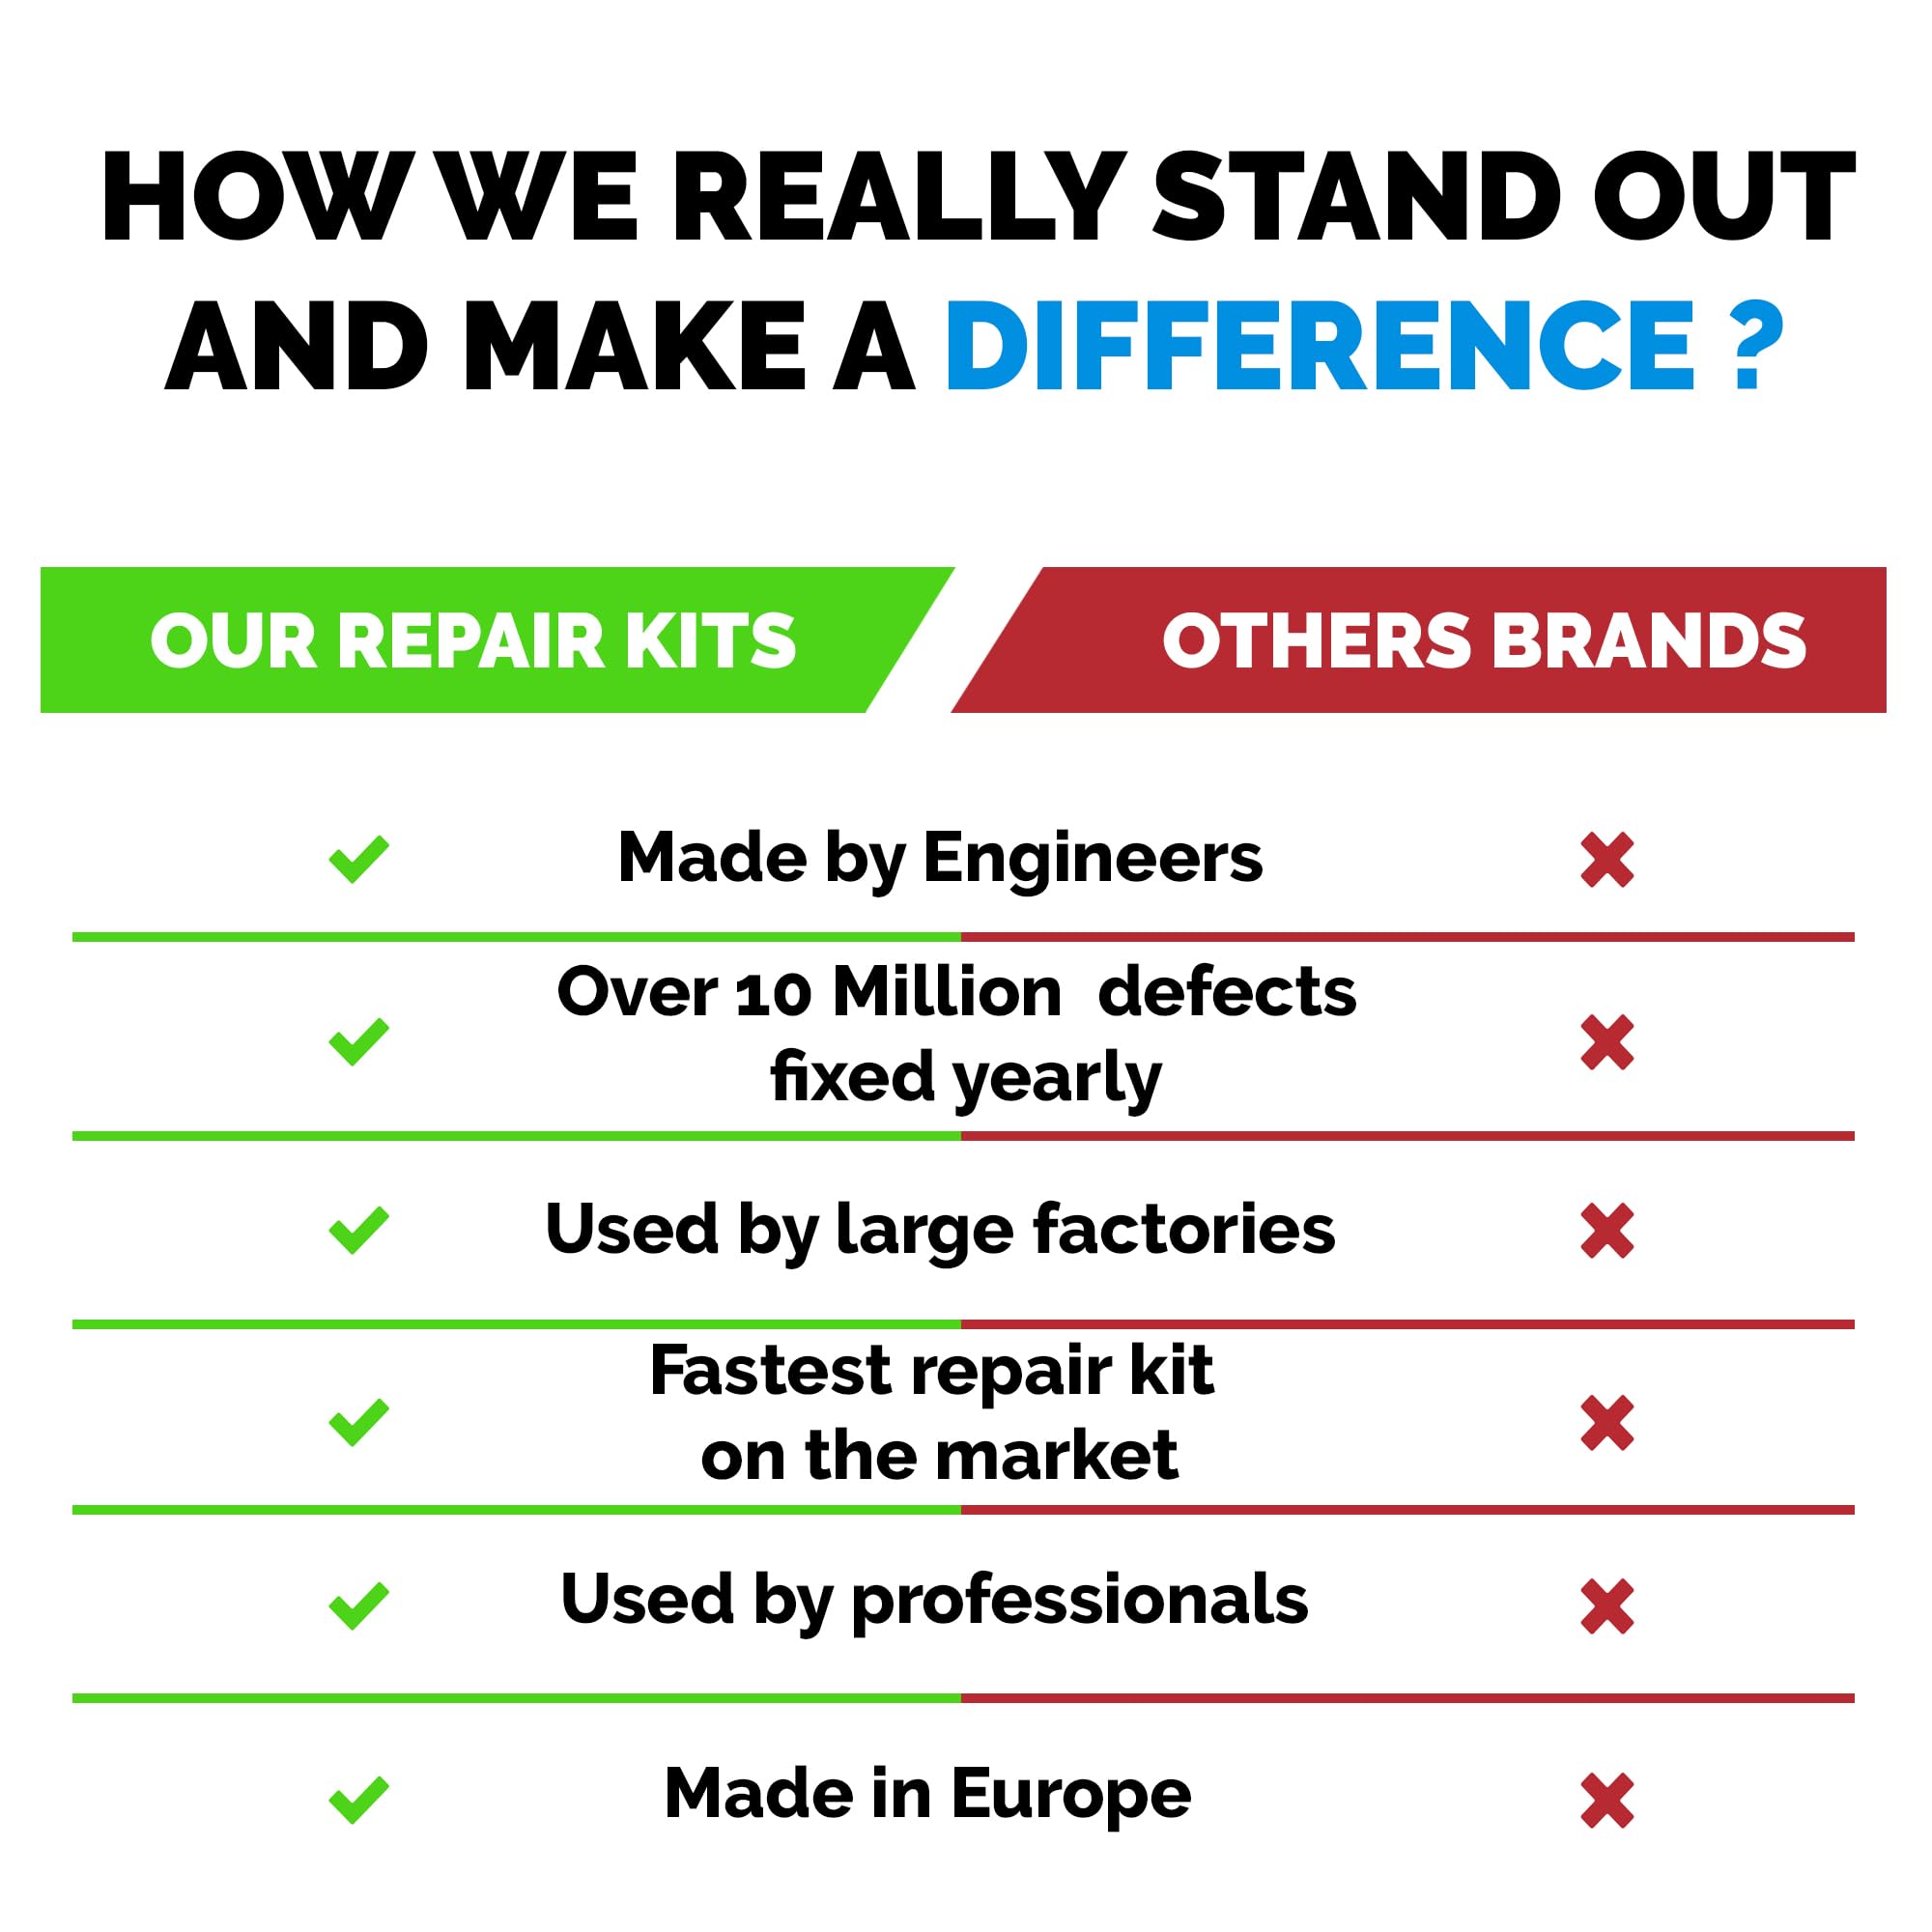
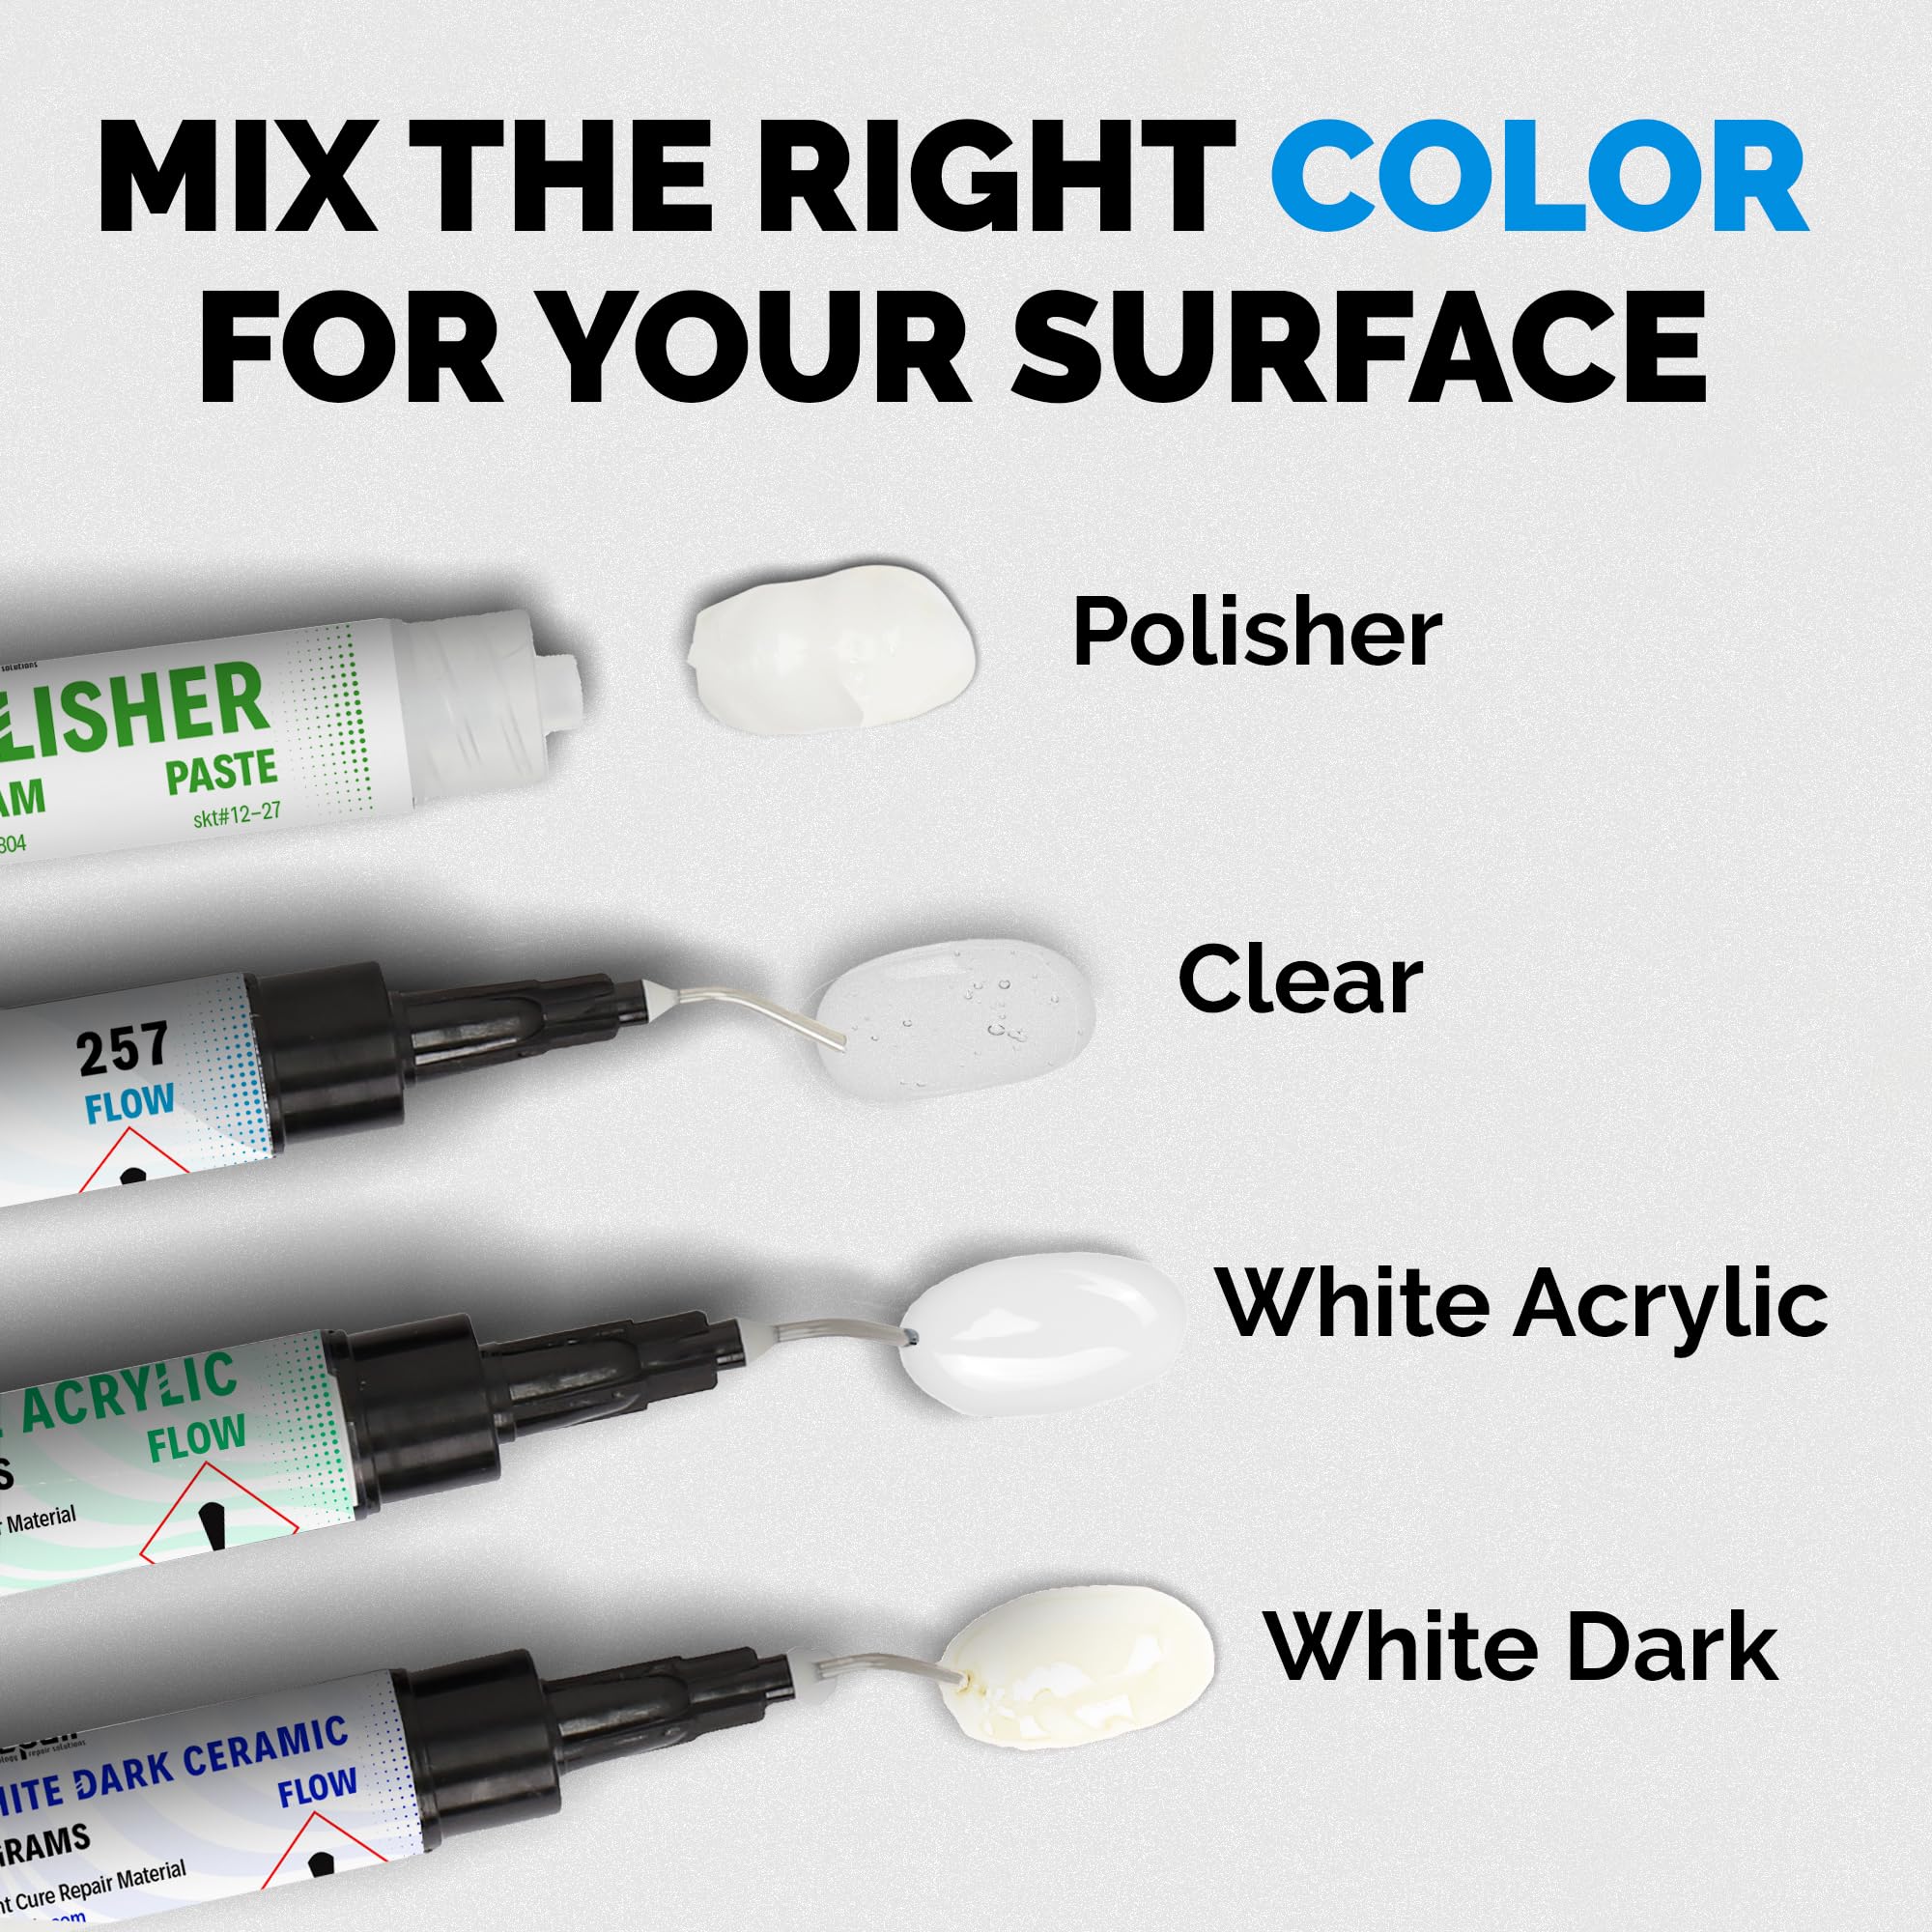
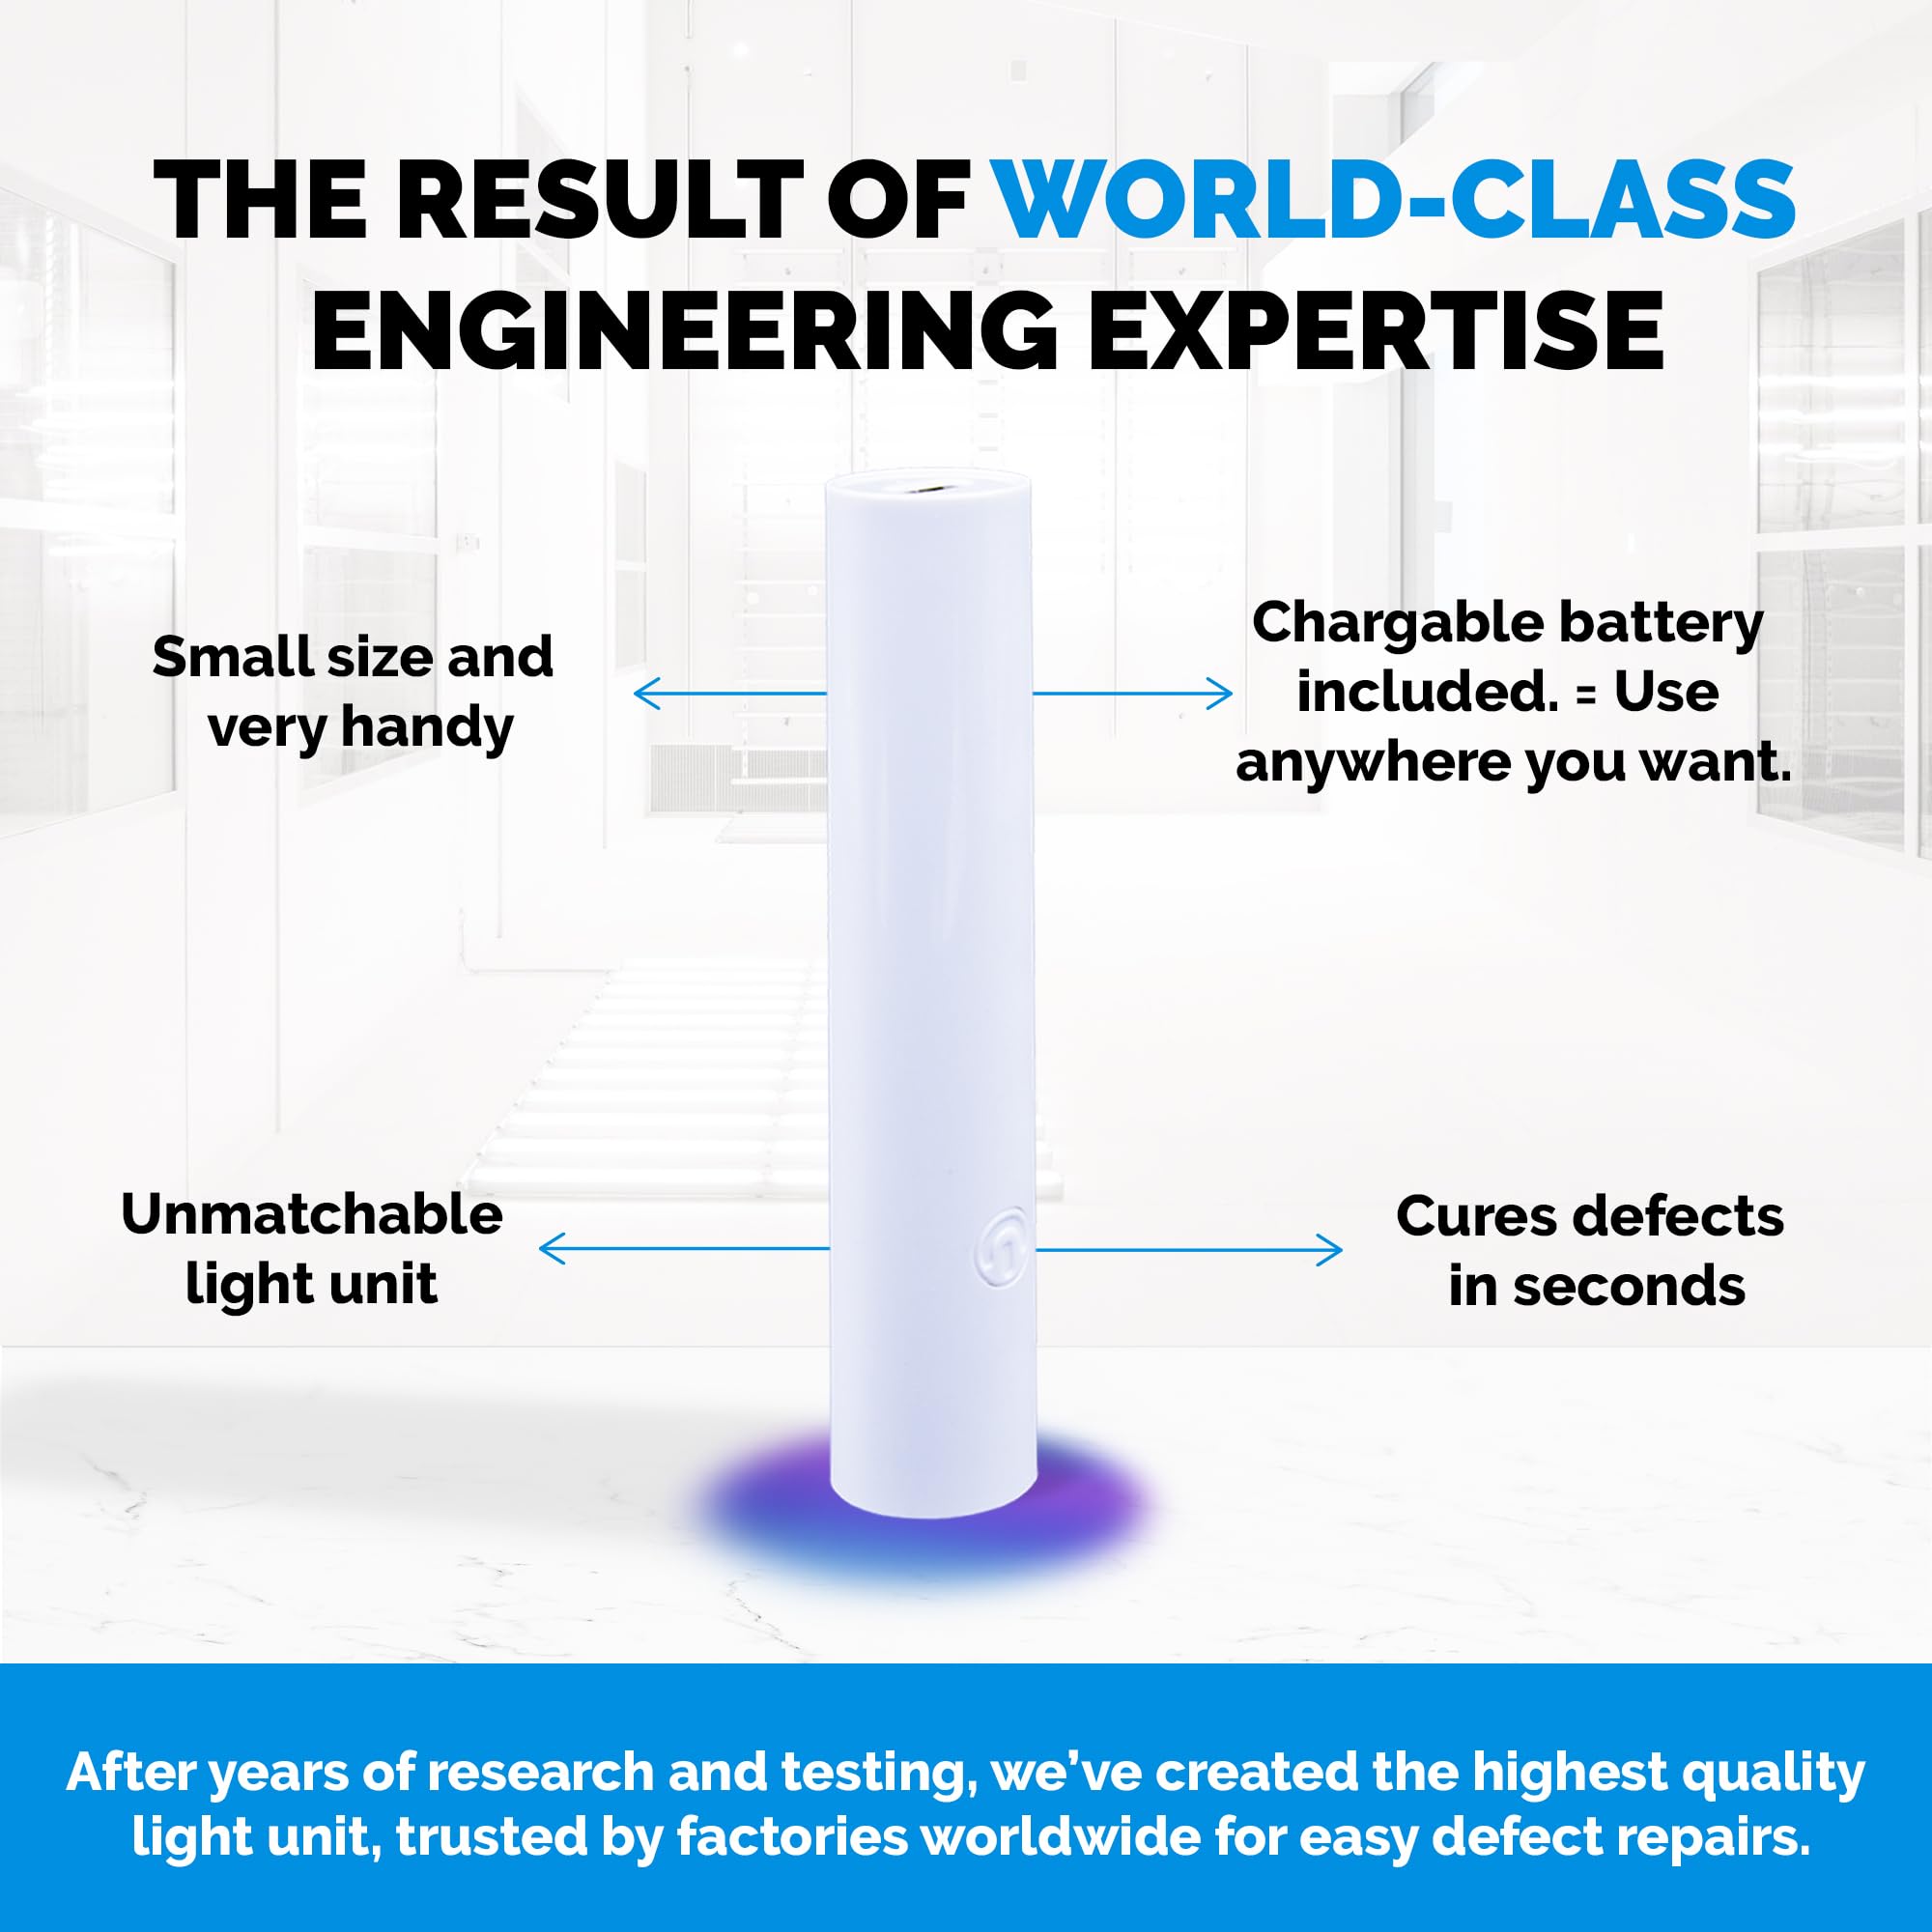
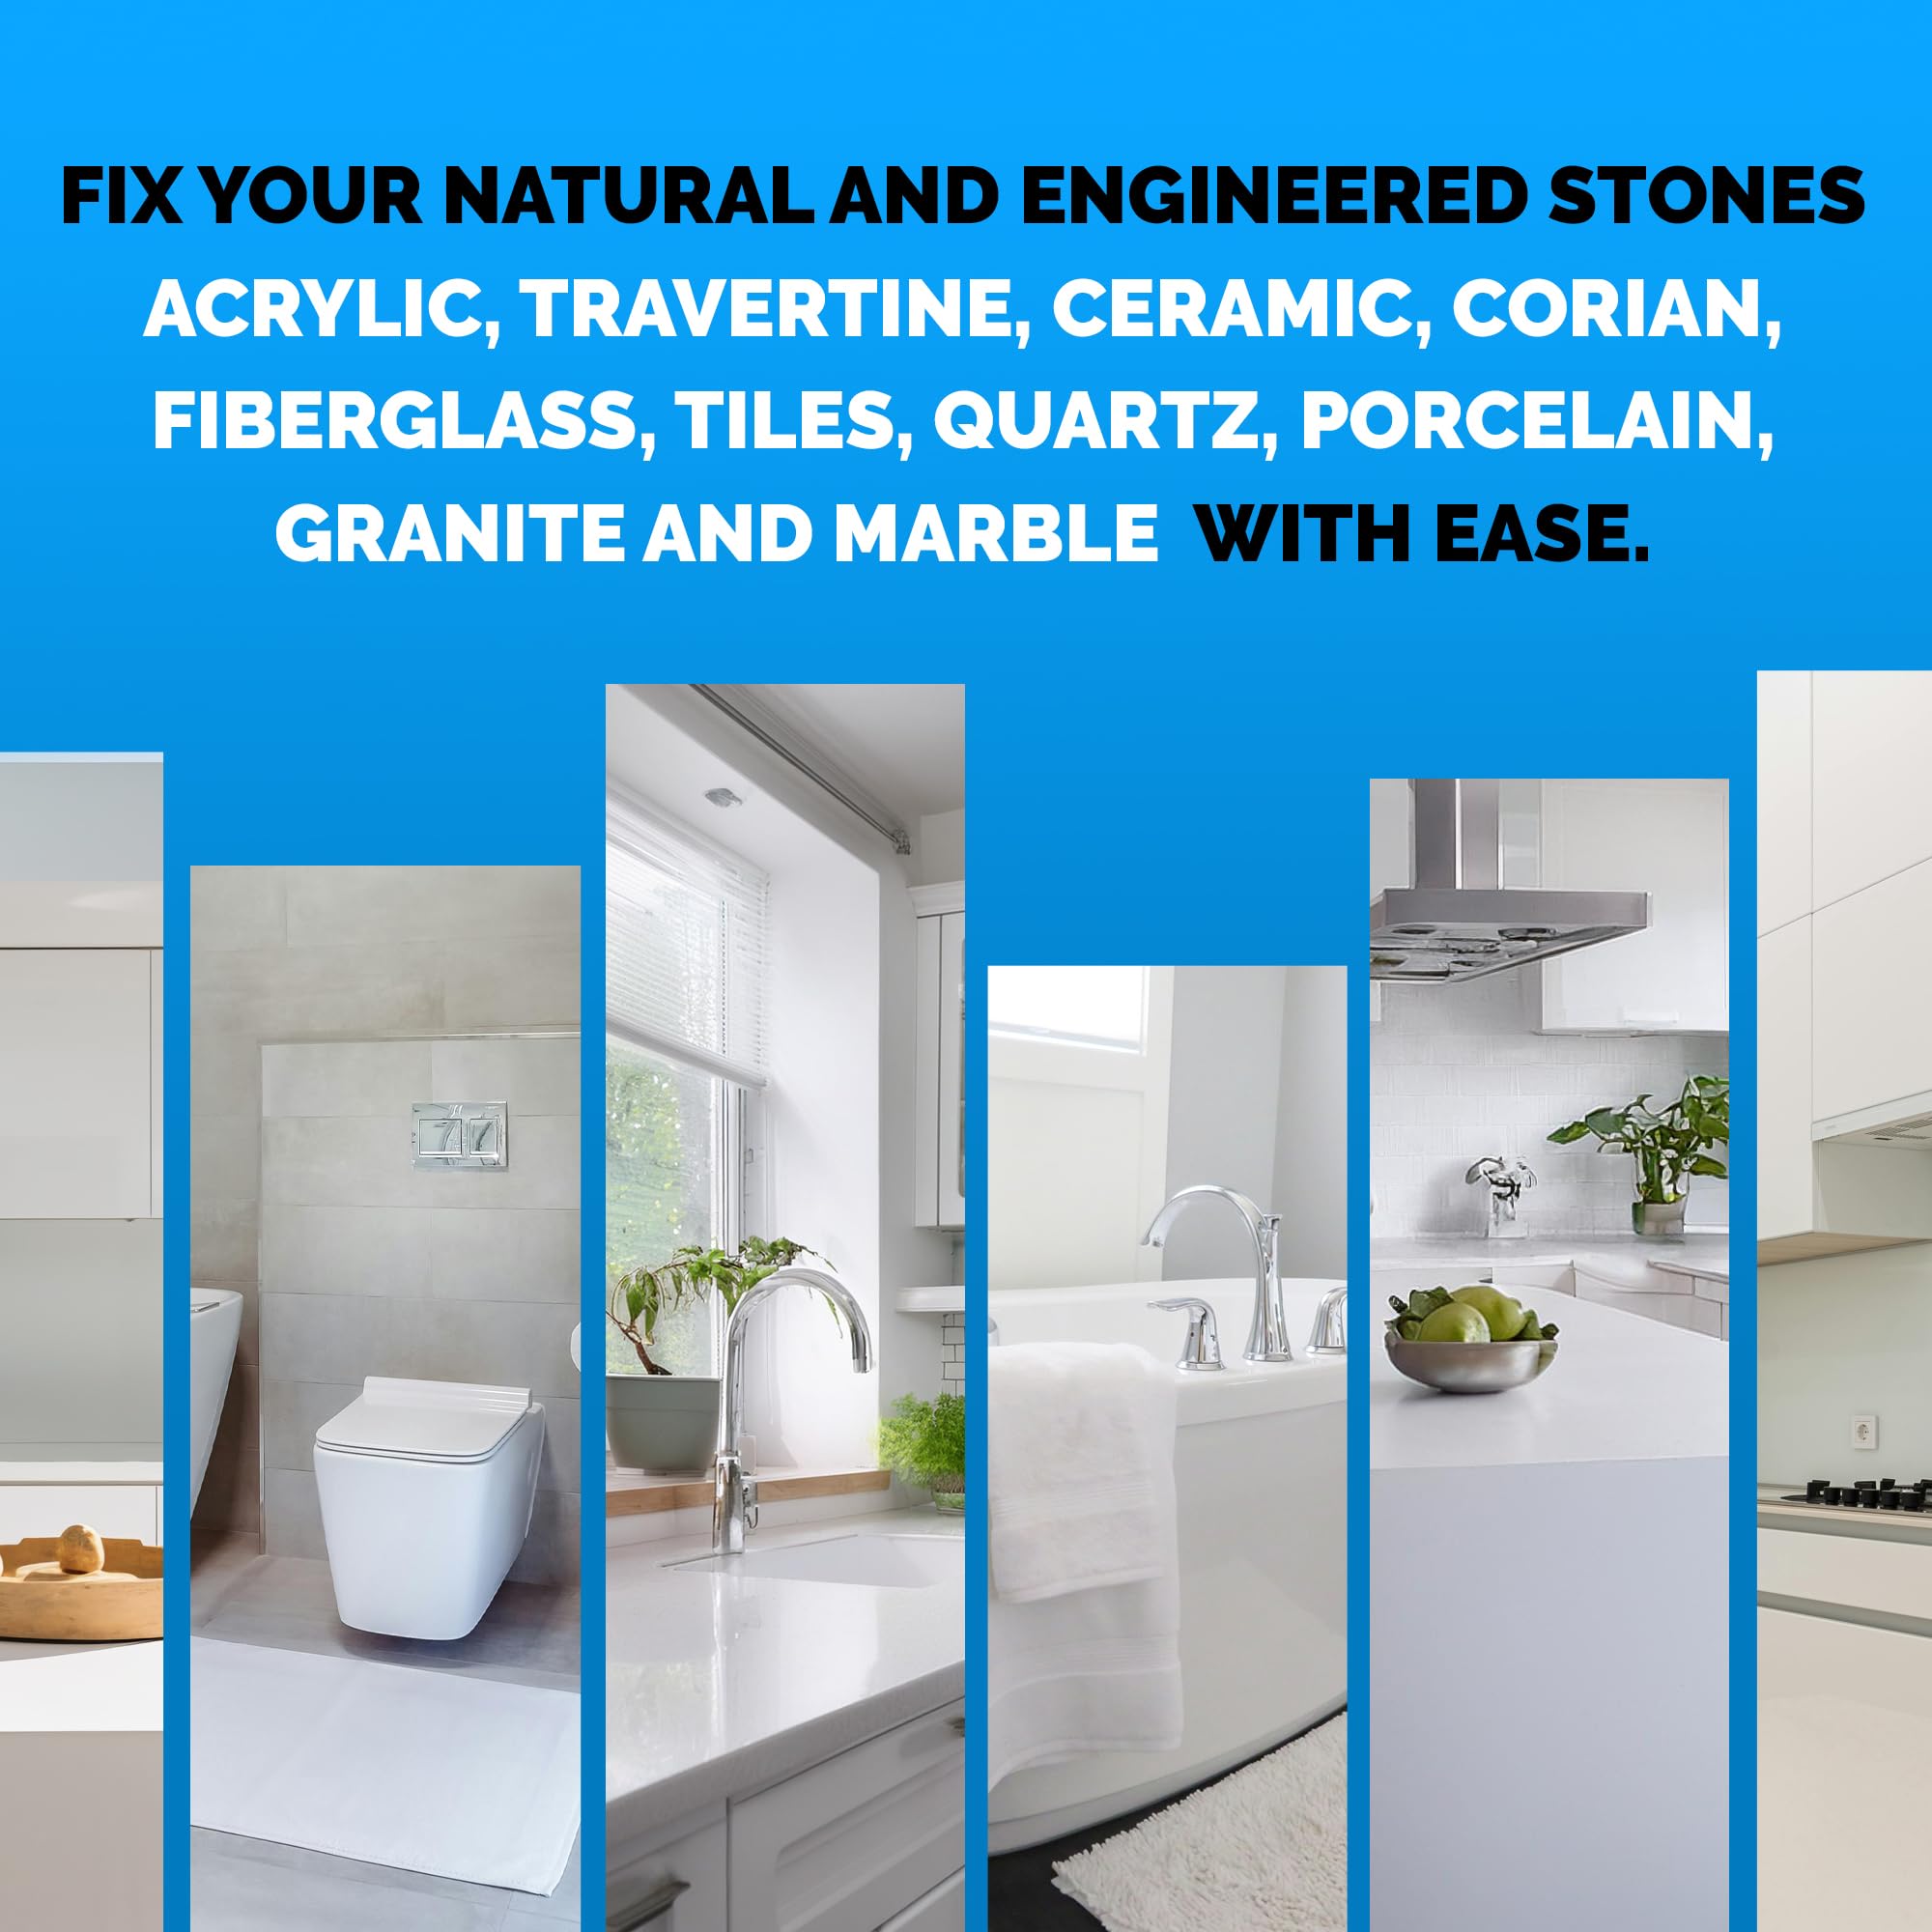
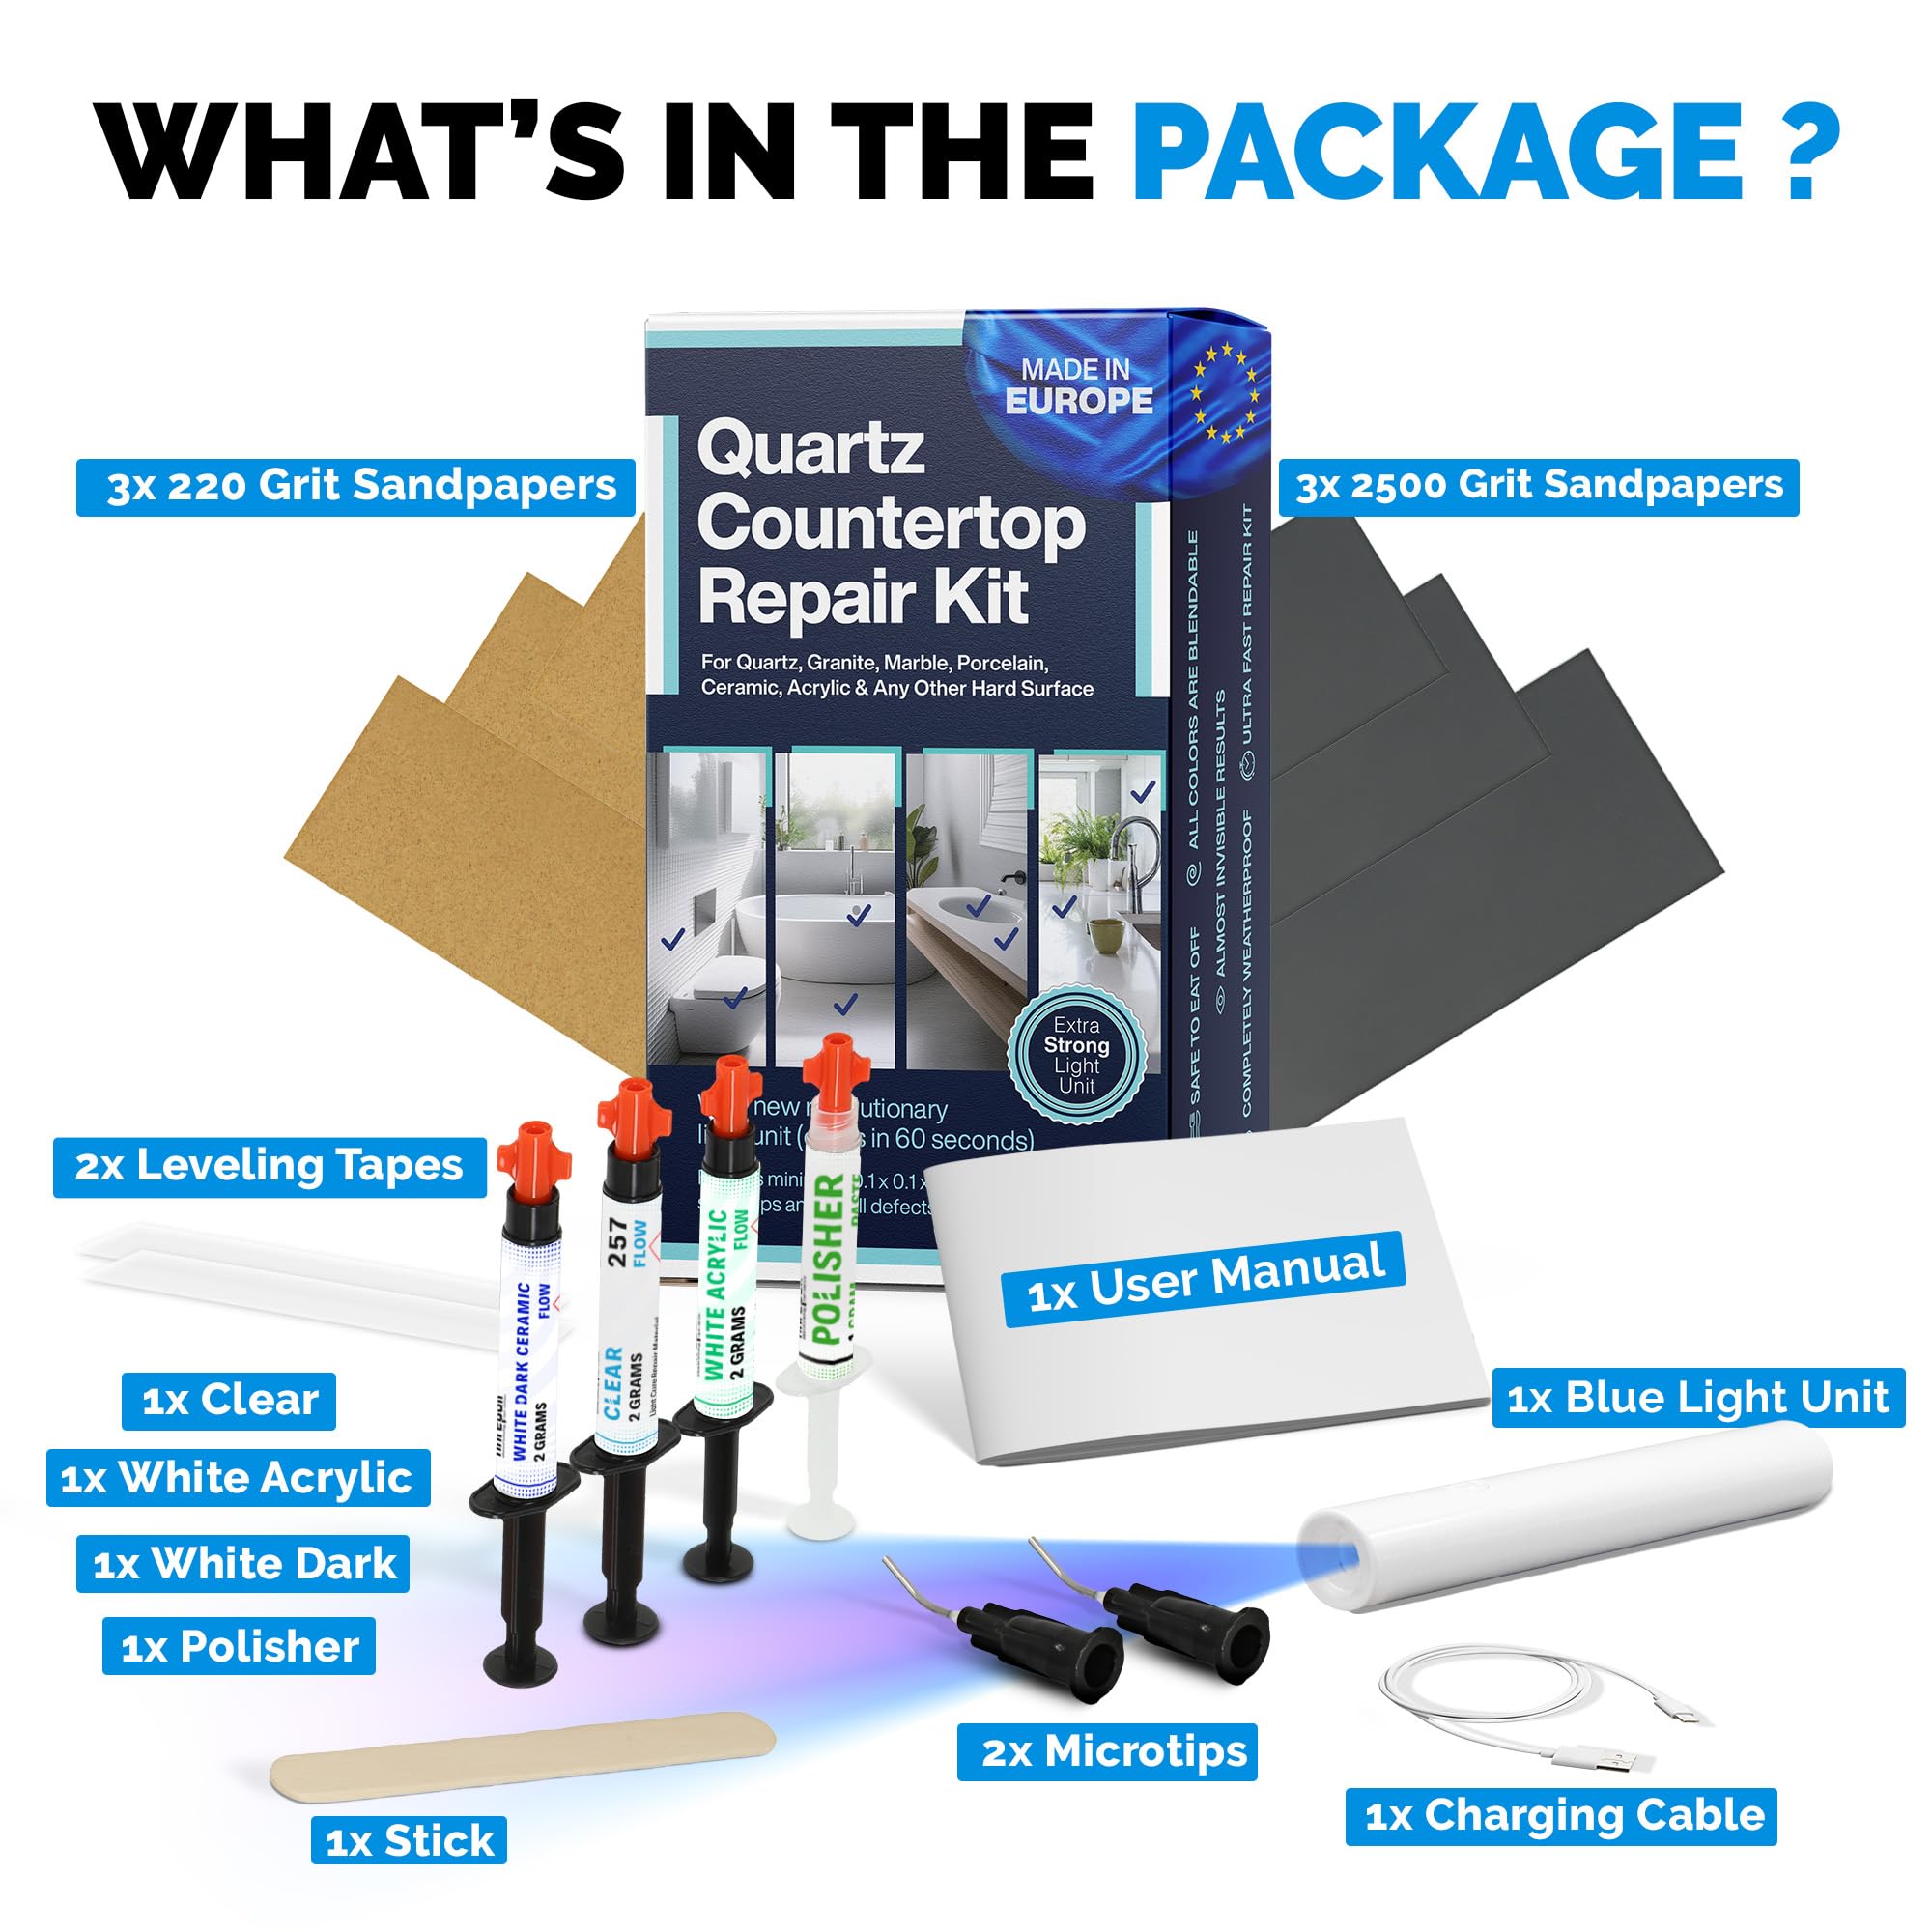
The NNREPAIR Quartz Countertop Repair Kit is a professional-grade DIY solution designed to seamlessly fix chips and cracks on quartz, granite, porcelain, acrylic, tile, and ceramic surfaces. Featuring three versatile color options and a proprietary repair compound cured by an included blue light unit, this all-in-one kit ensures durable, near-invisible repairs. With over 20 years of industry experience and millions of successful fixes worldwide, it empowers homeowners to maintain pristine countertops with ease and confidence.


| ASIN | B0D65RV26J |
| Batteries | 1 AA batteries required. (included) |
| Batteries Included? | Yes |
| Batteries Required? | Yes |
| Battery Cell Type | Lithium Ion |
| Best Sellers Rank | #16,390 in Tools & Home Improvement ( See Top 100 in Tools & Home Improvement ) #12 in Household Countertop & Tile Paint |
| Brand | NNREPAIR |
| Color | Clear, White Acrylic & Dark White Color |
| Customer Reviews | 4.3 4.3 out of 5 stars (377) |
| Date First Available | August 20, 2024 |
| Included Components | Light unit, repair material, polisher and all accessories. |
| Item Form | Paste |
| Item Package Quantity | 1 |
| Item Weight | 2.46 ounces |
| Item dimensions L x W x H | 2.5 x 1.2 x 4.5 inches |
| Item model number | C101A |
| Manufacturer | NNREPAIR |
| Material | Acrylic |
| Number of Items | 1 |
| Part Number | C101A |
| Product Dimensions | 2.5 x 1.2 x 4.5 inches |
| Style | C101A |
| Surface Recommendation | Countertop |
| Unit Count | 1.0 Count |
| Water Resistance Level | Water Resistant |
F**G
Does the job!
Wife dropped a pyrex glass baby bottle and made a pretty big chip in our quartz countertop, about 1/2" diameter and 1/4" deep. Not happy! The countertop is huge, new, and very nice. Looked awful, and was worried about how dirt and liquid would start to penetrate and make it worse. Saw reviews for this, and it did the job. It sealed the chip, blends in well, seems solid, and most people (that don't know to look) won't notice. I thought my countertop was white and tried the white and white-dark fillers. White-dark did not seem very dark, but was the closest match. Watch the videos, it's simple to do. I wish I would have used a level sanding block or wrapped the popsicle stick instead of my finger only (when sanding), because I took a bit too much off, and it has a slight depression. However, overall, it's a good product and I have much product left over. Recommend.
G**.
By far the best thing I've ever bought for a "repair"
If you don't want to read my entire review, I'll make it easy for you. BUY THIS THING. Now, the more detailed review: A few days ago I noticed a chip on the edge of my white (with grey veins) countertop. I almost had a heart attach because I just bought my brand new home about a year ago and the least thing I want is for it to start having broken things. I live with my girlfriend so I knew it was her, even though she didn't admit to it, lol! Anyway, I tried touching it up with paint, white silicone, even leather repair paint and it just didn't look too good and if you would rub on it a few times it would just peel and the chip would come back! I decided to give this product a try because, why not, right? My first attempt wasn't too good. I followed the instructions and after I filled the craack/chip with the product, I put the leveling tape and used the flash light. Now sure what happened but the entire thing stayed on the leveling tape. I tried again and instead of 60 seconds, I did 120.... It looked freaking great right away. I had a little bit of extra material that already harden, so I used the supplied sand paper. I started with the rough one (don't be scared to use it) and then I followed with the smoother one and a little bit of water. I really looked great. Smooth, flat, and the color was a pretty good match. Then I applied a little bit of polish compound with a clean microfiber towel and I was done. There was a tiny, very tiny pinhole on the top that I wanted to fill in and I repeated the whole process and this is when things went bad again. The hole thing dettached and I went back to square one. I am not sure why but I tried at least 3 more times and the product didn't want to stay on the chip. It will harden but stay on the leveling tape. And yes, I cleaned the area prior to each applycation with rubbing alcohol and let it dry. So, I decided to avoid the leveling tape and be super patient and apply tiny little dots of product and kind of spread it all around the area. The product itself is pretty good about leveling itself. If you are patient, you can pretty much make it all flat. So, once I check and thought that the area was completely filled, I just put the blue light flash ligth about half an inch above the repaired area for 60 seconds... and then did an additional 30-40 just in case. I checked and the product hardener real good and tested it by rubbing my finger all over it and it stayed on. Since I eyeballed the repair and didn't use the leveling tape. I had to sand the area down (you would have to do it anyway), gently but without being scared. Again, first I used the rougher one (without water), and then once I felt that the excess has been removed, I used the smoother sanding paper with water. Then, I proceeded to use the polish compound and that's it! The results are pretty darn good! I would say this product will disguise the repair a solid 90%. To the naked eye and if you don't look for it, I could even say that it will fix it 100%. But since I am super OCD, the other 10% is just if you find the right angle and the right lighting, but that is just me being extreme. This thing really does a GOOD JOB! And honestly, I don't think a professional repair would look any better, if anything, maybe like an additional 5% if they 100% color match it but if I am telling you that this thing works and looks good, TRUST ME. I am very perfectionist with my stuff and I am completely happy with the results! Attached before and after of both of my repairs for you to be the judge! Thanks for reading
K**.
Was able to fix a thin chip in our quartz!
I highly suggest reading and watching a video 1st. Also, prior to starting try out the white colors on a piece of parchment. My quartz is Calcutta a white, but of this white mix the darkest was the correct white. Also, to fix a tiny hole ( see orange strings cap) the clear worked best. Also, if you sand heavy like me be prepared to see blue painters tape sanded off as well or use a white, but all I had was blue. I began by marking off my area with 2-3mm gaps from edge of Crack. This was to minimize the area if over sanding was necessary. I lined both the chip and the counter Crack area with a dor of the dark white and rest clear to fill. I had the transparent leveling tape ready and taped as this area was on the side and not flat to prevent dripping or movement of the chip. I then used the blue cure light 2x, 1x at 90 degrees to each counter top angle. Once the counter edge and counter top were cured I removed leveling and saw I needed to fill a tiny portion on the counter top with the white gray. Then I cured the top one more time. Then I began sanding. Suggest using the popsicle stick to help get a flat edge while sanding to help match the edge and shape your counter makes. The flat portion helped sand. Then be prepared for a slight mess when you add a drop of water and use the finer sand paper. It will look awful until you wipe it off. Then I used the polish which exploded. I still was able to use it and the end result was great. I would try this again. I will try to reach out to the company about the polish issue. This really made the chipped counter my husband did not a huge deal. This happened 8 years into se and not day 1 so I cut him some slack since it turned out well. *** disclaimer I know this states it isn't glue but it did work for our chip because it was thin enough for the blue light to penetrative and make a good bond. Hopefully it works for you too!
B**E
Works Great
I was hesitant at first but it seems the previous owners of this house repaired a hole in the granite and I never noticed it. Purchased this kit and it was truly easy. Read all reviews and package instructions and it works like a charm!
M**L
It worked well, but the quality of the tools can be improved..
I have mixed feelings about this product. I believe I was supposed to receive 3 microtips, but I only received 2. The blue light fell apart while I was trying to charge it. The inside got pushed forward, so I couldn't plug in the cable. I was able to push it back and used it to finish my work. I am very happy with the final results though. I am able to fix my chipped quartz countertop.
J**T
Great product
Worked great to fix the chip in my countertop and the color is almost a perfect match and I can barely tell the difference.
R**K
Great product that works!
We found a small (but noticeable crack) on new countertop— likely due to a cast iron pan. This product worked so well, I cannot even find the chip! It is clean, easy to follow instructions, and hardened for use quickly.
J**D
Pass
This is a light cured epoxy but the light doesn’t work. Doesn’t even charge. If a simple light can’t be reliable, how can I rely on the epoxy?!
I**E
Réparation effectuée sur un comptoir de quart ; facile à utiliser, instructions assez claires et kit complet pour trouver la bonne couleur. Je suis très satisfaite de mon achat.
W**T
Fonctionne parfaitement si on suit à la lettre les indications. Patience, légèreté dans l'application et minutie.
S**M
Brilliant stuff. Not perfect, and a lot depends on the user mixing the right colour and sanding it properly, but I filled 2 chips. The smaller one is virtually invisible - near perfection. The deeper one on the edge wasnt as successful given that it's on the edge and impossible to get a good line but 85% of the way there so can't complain.
K**R
Works really well... I have fixed 3 different marks on my granite and it's almost impossible to tell where the damage was
A**E
Echt super, und hält auch
Trustpilot
2 months ago
3 weeks ago