
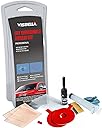


Visbella Windshield Repair Kit for 2 Chips
Product ID: 16299736
✨Restores clarity
🔧Easy DIY repair
🛡️Prevents further damage
🚗 Fix it fast, drive it proud!
The Visbella Windshield Repair Kit is designed to effectively repair up to 2 chips in your windshield, restoring it to near-new condition. This user-friendly kit requires no special tools, making it a safe and convenient solution to prevent chips from spreading and to enhance visibility.
B**P
Works as described
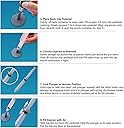
I don't write many reviews so when I do, you can expect that I have something to say. This product works as described. It doesn't make the crack go away completely, but it does fill in the crack and chip quite well. I had a snowplow throw a chunk of ice at my windshield which created a half-penny sized chip and a foot long curved crack on my windshield. This product filled in the chip and the crack and instead of seeing a quarter inch deep crack, it appears like the windshield was mended back together when viewing at an angle. All you can see after the product cured is a thin line where the crack still is and a few spots that the liquid did not completely reach down in the glass, but otherwise the glass appears to be a continual piece where before you could distinctly see the thickness of the glass where it was cracked. Highly recommend. I put it on with Negative degree weather in Wisconsin and let it cure for a few hours in a cloudy day before taking a razor blade to scrape away excess product that didn't fill in the crack. From the directions, it only warns against hot weather. I would definitely buy this again when I crack my next windshield. For $9, you couldn't go wrong. Added Note Since the Instructions are a Little Hard to Understand: The Plunger/Suction operation is only for better filling in of a chip. You can just squirt on top of cracks some of the liquid and then use the thin films provided to cover it and push it in better or leave it uncovered, either way for an hour to cure in sunlight and then take a razor blade (one is provided) to scrape away excess left on the glass that didn't fill into the hole. Pretty simple process actually. To those who expect perfection, you need to go buy a new windshield, you get what you pay for.
C**O
Low quality seals,really bad instructions.. recipe for failure.
This is the first windshield repair kit I try, after watching several youtube videos on how to use this and similar, I felt pretty comfortable with how simple they were to use. However, it al depends on how good the product is! This product seemed good to me at first sight and the reviews were decent hence why I bought it. I opened it up and the first thing I noticed is that the instructions were terrible, super confusing, two different sides giving different sets of instructions on different steps of the process, on top of that the english is terrible, they are clearly translated from another language, most probably Chinese based on the grammar problems. Luckily (I thought) I knew how to use this because of what I have researched and because I read the instructions as bad as they were.. multiple times. Well... here is what happened. First step is to set the rubber seal on the glass.. perfect no problem. Next set the plastic base that will contain the acrylic substance in place and that will be used as the injector base. No problem done.. then put a few drops of the substance (5 to 6 drops it said), done no problem. Then use the injector (a syringe that comes with it) and inject the air as indicated by the instructions then suck the air out and hold in the locked position for 10 minutes... so far so good. Then the next step is where things went awry in the same exact way two times (I had to replace the seal twice). You have to release the injector, and then fill it with air and then inject air up to a specific measure... you really have to be careful (mind you the instructions don't say anything about this) ... because if you inject too much air you will pop the seal... well.. I did so very carefully and left in the lock position after injection the pressure air.. says: leave 20 minutes... well in both occurrences the seal popped after a few minutes under pressure... I am POSITIVE I did not inject too much, just the exact measure the instructions call for... Point is the seals are not strong enough and pop easily.. they don't stick well to the glass so the whole process gets ruined... I tried a couple of times since it only comes with 2 seals.. and thats it.. failed. I send it back... a product that is so easy to fail with is not ready for market in my opinion... low quality in my opinion is the culprit here.. or perhaps more precision in the instructions of how much air to put through the injector? in any case, if you want to try and fail and possibly waste 10 bucks go for it. I am going to try another brand.
E**S
This system works fine, so don't look at the bad reviews
This system works fine, so don't look at the bad reviews, 'pilot error' in use does not make a bad product. Basically there are two 'systems', no matter what the brand/packaging. This one, the plunger syringe, and the suction cup spider with the screw in plunger. Both have their advantages, I bought both. This type works well for larger defects dues to the stick on pad can cover the spiders going out. And yes, these pad's adhesive can give up so CLEAN THE AREA WELL WITH ALCOHOL before applying the pad and WORK OUT OF THE SUN, the fluid hardens in the sun. The screw down plunger type is best with smaller holes due to its tiny 1/8" hole to push the fluid it, but higher pressure. Both you can do cracks, again always out of the sun,just apply some fluid down the crack, I use the clear strips cut thinner, and put them over the liquid fluid, then press out on the glass from the inside of the vehicle. Then let it sit as long as you can. It will not setup until the sun hits it. I have had good luck with the fluid seeping into the crack. After your done, roll it out in the direct sun with the plastic sprips over the repair and fluid.
I**Y
Not a One Shot Deal
I didn't receive any discount or incentive to write this review, this is my honest experience with this product. My windshield got a fairly deep pit in it, and that's why the purchase. Before I begin, let's have a quick physics lesson: gravity sucks, and windshields are sloped (usually quite steeply), and so the liquid polymer or whatever it is that this kit uses will run down the windshield unless you have your car parked on such a slope as to have the force of gravity perpendicular to said windshield. The instructions tell you to set up some kind of complicated thingamajig injection-vacuum system to complete the initial application. You can't see how much liquid polymer you're actually using because the tiny bottle is not clear. This is probably a good thing, because the stuff is cured by UV rays, and you don't want it curing in the bottle. Suffice it to say that you don't need to squeeze in much in this first phase, and should have plenty left. Phase 2: You find out that the pit is only partially filled, and you must do a "manual" application (don't retry the thingamajig), using a plastic film to hold the liquid in place. Phase 3: You find out that the pit is only partially filled, and you must do another "manual" application, using a plastic film to hold the liquid in place. Phase 4: You find out ... well, you get the picture, it might take several applications (make sure to let it cure in between). The pit will get smaller and smaller, and hopefully disappear before you feel like throwing the whole kit away. Goodfd fer y'a
B**L
Close, but no cigar
I was unable to achieve the desired result with the kit. Like others here have said the instructions were a bit difficult to follow. After I used it once and failed to get a good result, I think with another try I might have a better experience, now that I know what to do. Specifically, the double sided foam seal didn't seal well enough to contain the glue when I had to pressurize it. Additionally, the syringe does not have a twist lock or engagement feature when you insert it into the window cup, so when you go from vacuum to positive pressure the syringe wants to pop off. It makes it difficult to get good pressure to inject the cyanocrylate into the crack. After just a minute or two the double sided foam started leaking and the glue ran out from under the seal. At that point it would no longer hold any positive pressure.
G**M
Updated instructions were great, and results outstanding
The kit came with "improved and updated" instructions and I found them very easy to follow. I had two large chips from rock strikes, both with cracks coming from them and the kit made both chips virtually invisible and also improved the cracks, though they are still somewhat visible. My car is less than 6 months old so I was devastated to have had the windshield damaged so soon (gravel based road construction on a road with a 70 mph speed limit), and now without looking closely, you wouldn't even know.
J**.
but so far it is a great product. Assuming that the resin is as durable ...
Only applied it today, but so far it is a great product. Assuming that the resin is as durable as similar resins, it is perfect. The kit could easily patch a larger crack than most similar kits and is only limited to two repairs because it includes two adhesive rings. Depending on how much resin you need to patch the pit it could probably do 3-4 patches. For the price though, it is well worth it. If you've ever done a similar repair this is a snap and the items in the kit are comparable or maybe even a step up from other similar kits.
Y**Z
Product unsatisfactory
I had high hopes for this product, but they were shattered when I opened it. All items were covered in some type of oil-like substance, my assumption is resin. The reason I assume it is resin is because the hardener strips were completely stuck together like they had activated the resin and hardened. I decided to still use the kit and see how it worked. I cleaned the windshield and prepped it. I placed the foam adhesive down and placed the oily pedestal to the foam piece. It seemed ok, but not too secure. I put 3/4 of the resin into the pedestal and used the syringe to suction out the air bubbles. Everything seemed to be going so well. I then removed the syringe and put it back in to apply the pressure. While attempting to push the syringe in, I hear a pop... The pressure from the syringe popped the pedestal off and now resin is flowing everywhere. I clean up the resin and attempt to put the pedestal back on to try again. Unfortunately the foam piece is now drenched in resin and can not be used again. Luckily the package came with two foam adhesive pieces... So I clean everything off, remove the old foam, clean the windshield, and start again with the new foam. What a waste of time that was, as when I attempt to put the pedestal back on, I realize it has been warped (bent) and can no longer properly stick to the foam. So I remove the new foam and decided to just try setting it without using the positive pressure (positive pressure will help push the resin into all the cracks and crevices). I put a few drops of resin on the area, and then place the hardener. I let everything set up and then scrap off the excess. My repair job does not look great, and it definitely did not seep down into the crack very far. I am not sure how long it will last, but at least the top of it is sealed (which I am hoping will prevent the crack from spreading). Summary: Cheaply produced product with flaws in the packaging. Repair looks slightly better than the original chip/crack. Will monitor to see if it holds or if it spreads. I updated my review from 2 stars to 1 star. I can see that the crack is spreading after using this defective product. I would highly recommend others not to buy this product.
Trustpilot
1 week ago
3 weeks ago