


Buy anything from 5,000+ international stores. One checkout price. No surprise fees. Join 2M+ shoppers on Desertcart.
Desertcart purchases this item on your behalf and handles shipping, customs, and support to New Zealand.
๐ ๏ธ Elevate your brake gameโflare like a pro, every time!
The OTC 6502 Master Brake Flaring Tool Kit is a comprehensive, precision-engineered set designed for professional-grade single, double, and bubble flares. Covering a wide range of imperial and metric sizes, it includes all essential toolsโflaring bar, arbor press, adapters, tube cutter, and debarring toolโhoused in a durable hard case. Perfect for millennial managers who demand reliability and efficiency in vehicle maintenance.


| ASIN | B0075XHDHI |
| Best Sellers Rank | #273,478 in Automotive ( See Top 100 in Automotive ) #89 in Brake Repair Brake Flaring Tools |
| Brand | OTC |
| Brand Name | OTC |
| Customer Reviews | 4.6 out of 5 stars 596 Reviews |
| Global Trade Identification Number | 00731413561962 |
| Included Components | Flaring Tool Kit |
| Item Type Name | Flaring Tool Kit |
| Item Weight | 2.22 Grams |
| Manufacturer | OTC |
| Manufacturer Part Number | 6502 |
| Model Number | 6502 |
| UPC | 731413561962 |
| Unit Count | 1.0 Count |
| Warranty Description | Lifetime limited warranty |
A**Z
A total winner.
The shipping company had some delay on the road. Since I had a long weekend available to replace my brake lines, I couldn't wait for the shipping issue to resolve itself. I bought a more expensive set at NAPA. I'd resolved to send this one back. Gathering all my Popeye-ness, I doggedly made up endless double flares. After a while, the NAPA set began to crack at an eye, admittedly, getting a lot of stress. In time, I just had to return the locally purchased set. By now, this set had arrived. NIGHT and DAY better set. The threads are finer. You don't need quite so much Popeye. The flares seemed to come out cleaner (given that I was new to double flares and I'd gained experience and had developed a bit of a method). The transitions from one process to the other was easier. This unit is better designed, appears to be better materials and had no breakage. The tube cutter isn't as good as any of the Rigid cutters I have. I ended up using one of my own. Something I realized, it is often stated that the tube ends need to be cut square, de-blurred on the inside of the tube, beveled inside and out. It should be easy to cut square with any of the tube cutters. Practice, if you're new to double flares. But, a wonky flare may not be due to a out-of-square cut. I believe you can get the same result if your outside bevel (I filed mine) is not even all the way around. If you have a segment of the tube end with a thicker wall, after you bevel it, I do not think you can force it square in the flaring process. Just too much material. Watch the end thickness as you bevel the outside. Get it pretty close to even all the way around. Then de-burr/bevel the inside. Great set, gerat price. Nice case. A total winner. My truck even stops now!
C**K
Worked perfectly on .032 copper ACR tube for double flare.
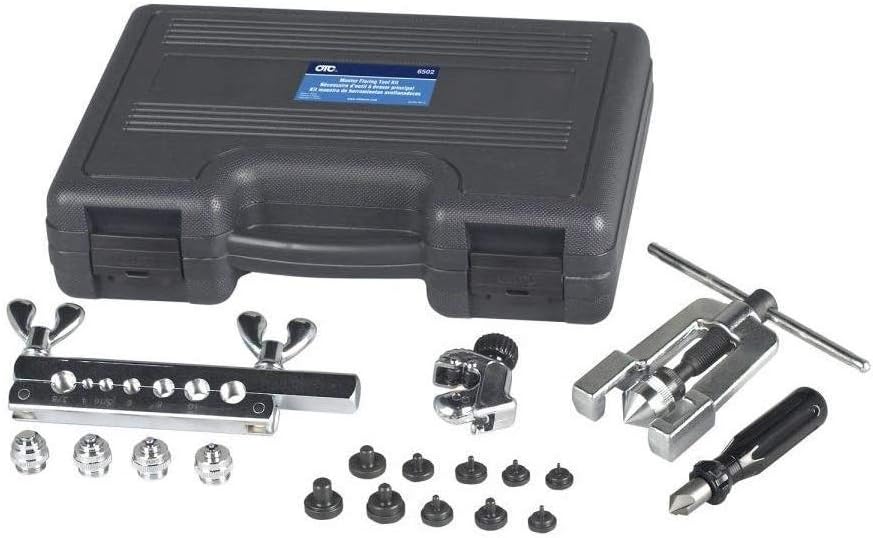
This is my experience. I am not a professional mechanic (I am an engineer), so it's application to your specific problem or my method may not be correct for your application.. The results for my application were excellent executed as I describe. You must choose appropriate tools, lube, tube, cleaners, fittings, and components for your specific application. There are safety regulations that must be investigated and followed to be legal. My federal marine fuel line regulation required a min. of .029 tube wall, so Cupro Nickel .028 lines locally available at auto parts places could not be used, I ordered appropriate approved copper line here on Amazon. I remade a damaged copper 5/16" fuel line with 5/16" soft copper tube (.032 wall) and 1/2" 45 degree brass flare nuts. Results were excellent. Completed flare was actually slightly more uniform than the original. This set of flare tools appears solid and sturdy if used correctly. In the photo above is a freshly made flare right out of the die (before I dusted off a stray burr sitting there loose with a copper cleaning pad. The pipe was cleaned and burr removed immediately after. Always inspect and clean off stray dust and particles before connecting. For those who have difficulty making good flare joints, the secret is all in the careful preparation. Once it's prepped with care, the rest goes quick and easy. Here's thoughts to help: 1. Keep the tool clean in its case when not in use and dirt and grit free. Get the right tube for the job that complies with regulations. Where possible, make sure you work on a straight section. Install the flare and nut before bending if working close to the flare. Use a good bender. I purchased one here for 5/16 tube. Follow directions for the specific tube; most guides say to anneal hard copper tube with a torch. Soft is easier and good to go without annealing. 2. Cut your tube to length using the tubing cutter gently to minimize distortion. Do more turns less pressure. Avoid a saw, but at least do not cut crooked! 3. Chamfer the tube with a good chamfering tool. The rigid tool I purchased on Amazon is particularly good in my test: "RIDGID 29983 223S Stainless Steel Pipe Reamer, 1/4-inch to 1-1/4-inch Inner/Outer Reamer". It has many small cutting faces vs just a few on cheaper ones; so makes a very uniform smooth cut. 4. Now you can clamp it up being very particular to follow published guides for the stick out past the tool. Get a good tight uniform hold. Double flare sticks out exactly the height of the die piece. Look at good instructions or watch a good video. 5. I now lubricated the double flare die. I used some high zinc motor oil I had handy for my marine engine. Tiny residue won't harm a gasoline carburetor. For brake lines, use only an oil compatible with your brake system or be prepared to clean it perfectly in solvent. Extreme pressure grease seems a good choice for hard to flare tube only if you thoroughly solvent clean after. The lubricant decreases the force necessary to flare smoothly. Avoid getting it on the clamp surfaces that grip the tube. If you do, clean with suitable solvent. On thumbscrew threads lube is fine, where friction is king holding the tube, don't use it. I tend to clamp tight, which reduces risk of slipping, which does leave a slight harmless pattern on the tube wall. 6. Once lubed, well gripped, and perfectly concentric, it will produce a good solid flare. I had no trouble going slowly and making repeated good flares. Good means a good clean uniform seating face with a nut that pulls it in straight. 7. Once the edges are chamfered slightly inside and out, check each end visually and remove any burrs with a copper cleaning pad. Point down while you do this so nothing falls in. Leave nothing to cause trouble. As an extra precaution, with no compressed air handy, I dropped a string through the tube, and tied a small piece of copper cleaning pad on, and pulled it through. This clears loose flakes or burrs out of the tube. 8. Practice is a good thing. I made a couple of test double flares. Including one I lightly coated with a dusting of spray primer and snugged up in the filter inlet a little; then rotated back and forth several times. I then unscrewed the nut and inspected the mating faces to ensure they were mating properly over 360 degrees. You can see the impression because of the coating. There are special testing dyes sold for this which are more appropriate. I cleaned the surfaces with acetone after testing to leave no residue. 9. Basically that is the way to success. Prep everything carefully. Make sure everything is straight concentric and smooth. Lubricate dies appropriately after clamping. Clean your work, check your work. Finally, after installing, leak check under full pressure. (use a flare nut wrench designed for tubing too...this minimizes the risk of rounding off or distorting a nut when tightening. Flare nut wrenches grip the nut face all around except for the tube gap, not just two faces). My creed is check your work at every step, and then do a final test. Every once in a while you still get a surprise when something just doesn't behave even though you thought you nailed it. That's it. For my app, with copper tube, set worked perfectly and still looks brand new on completion, so that's an A+.
V**S
Professional grade.
There's quite a lot of low quality flaring tools on the market that will frustrate you with crooked flares, or even just outright break in use. This is not one of those tools.
R**W
Does the job.
Not made in USA. But since the motor companies found a need to re-invent the end of a line with the bubble flare. Time to buy another tool or YouTube it with the double flare tool. This tool gets the job done and comes with all except tool to taper outside of line, so a file is still needed. Quality is good enough to last a backyard mechanic forever but not a tool that will be proudly handed down to grandson. LOL. But gas vehicles with hydraulic braking systems will not be what your grandson will ever own. Ha. Bottom line for a complete kit IMO worth the one and done cost. If no loaner is available at parts store.
O**O
Works well for double flare configurations
This tool set worked perfectly for doing a double flare on a 10th generation Toyota Corolla. Buy some cheaper brake line to practice on first if you've never done this kind of job before. Precision and attention to detail counts for getting a proper flare for a proper seat and seal with a brake line flare nut. Do it right the first time and it'll last. I recommend buying stainless steel flare nuts. On a 10th generation Toyota Corolla, it uses 3/16" lines with matching 10 x 1mm flare nuts. I like that this tool tells you on the main hose clamping piece itself what size die you need for making the flare for each size tubing. No need to look it up else where. I also like that this kit comes with a reaming tool for clearing off sharp edges and burs from cutting the tubing. Only things you'll need are some sandpaper and a small fine tooth saw for cutting metal for tight spaces where the included pipe cutter won't fit.
J**R
Quality tool
Tool is of excellent quality and all machined surfaces are finished well. The carrying case is fitted, so all of the dies and tooling is neat and organized. The tool easily made up the flares I needed to replace the 5/16" fuel line on my 1931 Buick. I used copper nickel tubing. Suitable for flaring lines made of softer materials, would not use on stainless lines. Tool is best used mounted in a vice. If using to repair a line on the vehicle, it is difficult to use. I was able to clamp the bar to the frame rail to help out.
M**E
Makes great double flares
Needed to make some double flares on some copper pipe and it worked great. There's some nice diagrams printed inside the case for quick reference on how to make double and barrel flares. The tool seems heavy duty so I expect it to last.
R**P
Stainless
OTC is always my go to for tools Brake flare kit is real nice,beat it up flaring new lines for my truck
J**G
Good Kit - Decent Price, had no issues with the flares.
I have nothing bad to say about this set. I bought it for bubble flares only, but I figured the capability to the other types was worth the investment instead of buying multiple singe kits. I should mention I only used CuNi line, which is much softer than steel, so I can't comment on how this kit works with that - but for my time/money I would only use CuNi since it's so much easier to work with. I read many other reviews that recommend beveling the outside of the tubing slightly with a file - it did seem to make a difference in the smoothness of the bubble itself. I completed 9 flares with at least half of them being on the car - only had one that leaked initially but tightened it up and it stopped. I was a bit nervous spending a bunch of time redoing a brake system only to find out that the bubbles weren't good enough, but everything went well. While brake work does take a little time (usually more spent dealing with rust and rot issues than anything else), you can save a ton of money vs. a $60/hr shop rate to install $50 worth of parts. I thought the value was good - there are definitely more expensive kits, but this one seems solid and heavy, and is a reasonable price point for the backyard mechanic.
O**Y
Flare bar machined poorly
This flare tool kit is made poorly. 1. Double flares come out on an angle due to flare bare machined on an angle. 2. Bubble flares are flared in old obsolete SAE type and not DIN as in modern cars. Overall kit looks good but performs poorly. I used it on Copper Nickel lines. I'd expect better with this kit being made in Taiwan. :(
K**.
Poor Quality!
Unfortunately, OTC reflects stereotype that expensive kit will have good quality. Tried on 3/8 tube, absolutely awful to perform. With perfectly prepared deburred and chamfered tube, with square face and multiple attempts - consistenly getting skewed flare, in the same place. May be good for 3/16, nothing above that. Returning as no difference between this kit and cheepo...
K**O
Quality product
I tried to do some standard and bubble flares with some Princess Auto cheapo kits, and got everything I paid for. This set was 3 times the money, and did 100 times the job. You get what you pay for, but you don't have to spend a ton on tool truck stuff for it to work great.
V**A
Works good for the price
I bought this kit to do the brake lines on my mustang. Overall it works better than the cheap kits that are found online. I had some trouble with the clamp not biting into rhe brake line enough but that was fixed with a C - Clamp to clamp onto the tool clamp. Overall the flares turned out good with no leaks. For occasional use this set is good. For a shop setting i would recommend a better tool.
Trustpilot
1 month ago
1 month ago